Winter Strip Down and Rebuild (Done and Dusted)

The place to "speak geek"
User avatar
Mikie711
Posts: 4344
Joined: Mon Sep 10, 2007 11:21 pm
Location: Aberdeenshire.
Contact:

Re: Winter Strip Down and Rebuild

Post by Mikie711 » Wed Jan 14, 2009 1:52 pm

Thanks guys :thumbsup .

Kev, no idea when I'll get it finished. A lot depends on some stuff I am still waiting for, sump baffle, cam cover and some bolts etc I am missing. Once the engine is built and back in then I can get the rest of the jobs done that really need the engine in place to see where everything needs to go. BTW gave up on the airbox idea as I got one of Berrnie's for a good price, complete :thumbsup.

As for the engine being tight, at the end of the engine manual it says to turn the engine over with a torque wrench and check that it is not more than 31Nm. So, did this and with a steady even turn it doesn't exceed 24Nm, relief :lol: . I am sure now that it is the Millers glop that is the reason for it feeling tight and as soon as oil gets in there it will be even looser. So all is good, time to crack on with the cams and timing. Although I might have to wait as I don't have the spring for setting belt tension yet, but will at least be able to get them in the ball park.
Elise S2 260
BMW M2 Comp
RRS HST
BMW R1300GS

User avatar
Kev
Posts: 592
Joined: Tue Oct 17, 2006 12:27 pm
Location: ABZshire

Re: Winter Strip Down and Rebuild

Post by Kev » Thu Jan 15, 2009 12:41 pm

Loving your work Mike :thumbsup

You got a fair bit done after i left then
S2 Elise ST (V6 spec)
Audi A4 Tdi (Shed Spec)
Discovery 3 (Wifes Spec)

User avatar
Will ing
Posts: 72
Joined: Mon Aug 04, 2008 12:48 pm
Location: Aberdeen

Re: Winter Strip Down and Rebuild

Post by Will ing » Thu Jan 15, 2009 1:52 pm

Great thread Mike, like you I've been busy over the winter finding just enough time to disconnect my battery :oops:

User avatar
robin
Jedi Master
Posts: 10540
Joined: Mon Mar 27, 2006 1:39 pm

Re: Winter Strip Down and Rebuild

Post by robin » Thu Jan 15, 2009 1:53 pm

You should deffo use a sensor for barometric pressure correction along with one for inlet air temperature - e.g. the TMAP as used on the EU3 engine.

I don't suppose you will be able to control the engine with a manifold pressure sensor though - so you'll have to map it alpha-N (i.e. on throttle angle alone).

Rather than using the IAT hole that is probably tapped into your throttle bodies, I suggest you blank that and mount both IAT and barometric pressure sensor in the airbox somewhere (i.e. the fresh air side of the throttles). On closed throttle the IAT mounted on the engine side of the throttle gets bollocks readings because there is no air mass to cool it and it just get's heated by the metal work, so it ends up approximating a engine temp sensor at idle, which isn't very useful.

Without an IACV I think you're going to have to aim for a compromise warm idle speed (using ignition timing to slow the idle, rather than air/fuel) whilst still getting enough air into the engine for a fast idle on cold. DVA suggests using a syncrometer to tune the throttle bodies on warm idle - you want 6 kg of air per minute IIRC.

Cheers,
Robin
I is in your loomz nibblin ur wirez
#bemoretut

User avatar
hiscot
Posts: 757
Joined: Mon May 08, 2006 8:56 am
Location: North Scotland

Re: Winter Strip Down and Rebuild

Post by hiscot » Thu Jan 15, 2009 7:12 pm

mike ask your mapper what way he is going to map it i expect by tps , i agree with robin make sure the air temp sensor is either mounted via airbox or backplate
on the exige t bods it suffers badly from heat soak ,even whilst running
the bario correction is also a good idea and only vents to atmosphere so can be fitted anywhere ,you will only require a 1 bar sensor ( early punto )
an idle valve is nice to have it gives a far better idle under load conditions warm or cold than by advance , my mapper can fit one to jenverys again ask your mapper
the syncrometer does what its called syncs the butterflys to open together ( i used to use these on bmw boxer engines (( ex motor bike mechanic )) you will want to balance the butterflys before any idle ( if adjustable ) then any intake runner screws lastly the idle screw , you may have to go back and forth until its right as one adjustment can effect another exige t bods dont have this
cam adjustments are best done on the rolling road if your mapper is willing ( i will be leaving my clams off until mapped and adjusted and checked for oil / water leaks ( when the time comes ) but this will require a trailer
i expect the oil coolers on mine to take a while to prime so i intend to pump oil throu the system before connecting up on yours i would fill the galleries ect as much as poss during assemble , preferably flushing them out with clean oil first , are you still using an oil thermostat ?
mineral or semi oil for 1k or 1.5k run in ?
bob

Light travels faster than sound. This is why some people appear bright until you hear them speak

User avatar
robin
Jedi Master
Posts: 10540
Joined: Mon Mar 27, 2006 1:39 pm

Re: Winter Strip Down and Rebuild

Post by robin » Thu Jan 15, 2009 9:46 pm

Good idea on leaving the clam off to allow easy tweaking of cam timing - not that hard with clams in place, right enough, but easier still with the clams off.

How would you go about setting up the cam timing - I know how to adjust for lift on overlap at TDC, but I don't have a good handle on how to decide on how much overlap is needed and whether to dial it in on inlet/exhaust or both. It seems as though the total "solution space" of settings is quite large, so a good strategy for getting to a good setting quickly would be of interest!

Cheers,
Robin
I is in your loomz nibblin ur wirez
#bemoretut

User avatar
Mikie711
Posts: 4344
Joined: Mon Sep 10, 2007 11:21 pm
Location: Aberdeenshire.
Contact:

Re: Winter Strip Down and Rebuild

Post by Mikie711 » Fri Jan 16, 2009 12:51 am

Another busy day with a lot of head scratching. Started off well enough when this arrive...........

Image

Shinny new sump baffle, so I had to see what it would fit like


Image

on the engine

Image

and in the sump can which will need a bit of attention with my dremel to make fit. Also need to lop a bit off the suction pipe to account fo the thickness of the baffle plate.


Any way, onwards and upwards as they say

Image

Cams followers and shims in ready for ...............


Image

........ the bearing ladder. Had to laugh when the book says fit within 20 mins of applying sealant. Takes that long just to get it all on never mind fitting it.


Image

Time for oil seals, VVC blanking plates, tensioner and covers. Ignore the cam wheel, my original plan was to transfer the marks from one set to the other, but seeing as this was once a VVC engine/head that went out the window when I realised it didn't have a second wheel that would fit once the new cams were in. This was when all the head scratching started. SO set the cams at full lift at TDC, 3.63mm/3.05mm In and ex respectively, brought #1 piston to TDC and fitted the belt. Stuck a bit of tension in it turned round a couple of times and re-measured the lift a TDC :thumbsup .
Stood back and was in the middle of patting myself on the back for dodging that bullet when I realised to my horror that I had set both cams as inlets so to speak. Rather than setting the lift BTC on the exhaust I had set it after :oops: .


Image

In the middle of resetting the timing, the right way. Ignore the socket and bolt in the inlet side, couldn't find the bolt and washer. Did find it by the end of the day, funny how things disappear and reappear on a work bench.


Image

Marked up a new set of ball park timing marks for next belt change, make life a lot easier next time.


Image

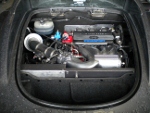
Started fitting some other bits and bobs to the engine, dip stick and water rail.

Next up crankshaft oil seal, not looking forward to this as I don't have a suitable tool. Open to suggestions as to the best way to get this seal in. Was thinking of using an old flywheel and a piece of steel plate to act as a spacer but not sure the flywheel bolts will be long enough. Anybody any ideas.

Tomorrow will mod the sump can and suction pipe then fit the baffle. Get the engine into the car and fit the gearbox etc, etc, etc.

Still waiting for a bunch of stuff to arrive so I can finish it off but getting there.

Will discuss the induction stuff once I've had a think about it. I will be using the IAT sensor I have and was thinking of using the map sensor from the VVC plenum that I've got but definitely no IACV there is no connections on my throttle bodies anyway. Not sure how complicated the map sensor would make things assuming the emerald can deal with it.

Edit: forgot to add the other thing I got today was a base map from Emerald for a engine almost the same as mine, not sure how "finished" it is but comparing it to one for a Caterham with 1227 cams it's pretty close so should save a bunch of RR time :thumbsup
Elise S2 260
BMW M2 Comp
RRS HST
BMW R1300GS

User avatar
Mikie711
Posts: 4344
Joined: Mon Sep 10, 2007 11:21 pm
Location: Aberdeenshire.
Contact:

Re: Winter Strip Down and Rebuild

Post by Mikie711 » Fri Jan 16, 2009 11:07 pm

When I finished up yesterday I got thinking about the cam timing, sad I know, and how I found it difficult to get consistent repeat results for the valve lift. So pop on to Dave Andrews site and used his design for jigs to hold verniers figuring they would hold them steadier and give repeat results time and again. Here's what it looks like when set up.

Image

Image

Of course you need 3 verniers to do it this way but you get to set them at exactly TDC, no guess work like when using the timing marks on the engine. Made the brackets from some sheet I had lying around. I am going to remake them with some 3mm plate as there was a bit of flex with the sheet steel. If you want to read up on this here's the link

http://www.s262612653.websitehome.co.uk ... /index.htm
Elise S2 260
BMW M2 Comp
RRS HST
BMW R1300GS

woody
Posts: 5635
Joined: Mon Dec 26, 2005 4:03 pm
Location: Southside Triangle

Re: Winter Strip Down and Rebuild

Post by woody » Sat Jan 17, 2009 12:33 am

Nice work Mike; I like the verniers. :thumbsup


Did you molykote the cams before fitting as well?

User avatar
Mikie711
Posts: 4344
Joined: Mon Sep 10, 2007 11:21 pm
Location: Aberdeenshire.
Contact:

Re: Winter Strip Down and Rebuild

Post by Mikie711 » Sat Jan 17, 2009 12:37 am

No, piper coat them with there own stuff and tell you not to remove it, also using their cam lube.
Elise S2 260
BMW M2 Comp
RRS HST
BMW R1300GS

woody
Posts: 5635
Joined: Mon Dec 26, 2005 4:03 pm
Location: Southside Triangle

Re: Winter Strip Down and Rebuild

Post by woody » Sat Jan 17, 2009 1:17 am

Mikie711 wrote:No, piper coat them with there own stuff and tell you not to remove it, also using their cam lube.
Ah, cool.

User avatar
Mikie711
Posts: 4344
Joined: Mon Sep 10, 2007 11:21 pm
Location: Aberdeenshire.
Contact:

Re: Winter Strip Down and Rebuild

Post by Mikie711 » Sat Jan 17, 2009 2:45 am

Finally starting to look like an engine again............

Image
Elise S2 260
BMW M2 Comp
RRS HST
BMW R1300GS

User avatar
campbell
Posts: 17316
Joined: Sat Mar 25, 2006 12:42 pm
Location: West Lothian
Contact:

Re: Winter Strip Down and Rebuild

Post by campbell » Sat Jan 17, 2009 1:03 pm

That's not just an engine, Mike - it's a work of art!

Now, when you start it up, we need links to video and audio then...pictures won't do that justice ;-)
http://www.rathmhor.com | Coaching, training, consultancy

User avatar
Mikie711
Posts: 4344
Joined: Mon Sep 10, 2007 11:21 pm
Location: Aberdeenshire.
Contact:

Re: Winter Strip Down and Rebuild (Warning.....Loads of Photo's)

Post by Mikie711 » Sun Jan 18, 2009 12:02 am

Some more gratuitous engine pictures

Image

Crank seal fitted, flywheel and clutch on. Flywheel locking tool in place ready to torque the pulley bolt.


Image

New filter husing with the oil pressure switch (bottom) and pressure gauge sender (top)


Image

Couldn't resist it, had to stick the air box on and see what it looked like. Plan is to sort out the engine loom tomorrow and fit new drive shaft seals to the gearbox then horse the whole lot in. Finish plumbing in the oil cooler and 'stat. Fit the exhaust temporarily and load the base map. And of course start the bloody thing. Away Wednesday lunch time so better get busy.
Elise S2 260
BMW M2 Comp
RRS HST
BMW R1300GS

User avatar
bertieduff
Posts: 2253
Joined: Fri Jun 09, 2006 12:19 am
Location: Purple Side of the Moon

Re: Winter Strip Down and Rebuild (Warning.... Loads of Photo's)

Post by bertieduff » Sun Jan 18, 2009 1:59 am

Mike, plenty of it is beyond my comprehension, but cheers for the great post- brilliant reading/viewing :thumbsup
Lotus Corsa
Lotus Wagon R
Lotus Focus
Lotus Collie dug

Post Reply