
Steve,
Did you tighten the bottom pulley bolt before fitting the belt or after?
How did you stop the engine from turning while tightening the bolt?
Did you remove the cam locking tool before attempting to tighten the bottom bolt?
Cheers,
Robin
Coolant temp problems - Confirmed HGF
Re: Coolant temp problems - Confirmed HGF
I is in your loomz nibblin ur wirez
#bemoretut
#bemoretut

Re: Coolant temp problems - Confirmed HGF
What we had was while trying to do up the bottom crank bolt the tensioner was clicking, every click it turned out was the belt jumping a tooth. This was becuase my crappy torque wrench I reckon, belt was arond 45 deg out. The torque wrench has a very coarse ratchet so we only had a bit of movement and the clutch springs took up most of this, when the tesnion was removed the belt snapped back and jumped a tooth. I was trying to lever a screwdriver into the starter ring while John and Shug worked on getting the bolt done up. It all went tight, we assumed I had got the screwdriver in properly (It felt like it had) but it was the valves meeting the piston, but because there was no impact we got away with it... Chioce was strip it all down again and start again or take some brave pills, reset the belt and ignore it...  we went for option B (What a suprise!)
Its not the end of the world, valves are relatively straight forward to change (And FOC in this case!) I would strip the lot out while you are there and do the valve stem seals. A bit more work but while its in bits you may as well.
You will soon get sick of lapping valves though!
Good luck,
Rich
Its not the end of the world, valves are relatively straight forward to change (And FOC in this case!) I would strip the lot out while you are there and do the valve stem seals. A bit more work but while its in bits you may as well.
You will soon get sick of lapping valves though!
Good luck,
Rich
1994 Lotus Esprit S4 - Work in progress
1980 Porsche 924 Turbo - Funky Interior Spec
2004 Smart Roadster Coupe - Hers
1980 Porsche 924 Turbo - Funky Interior Spec
2004 Smart Roadster Coupe - Hers
-
steve_weegie

- Posts: 3249
- Joined: Tue Jun 28, 2005 12:40 am
- Location: Nessieland
Re: Coolant temp problems - Confirmed HGF
Right, thats the head off! Did a good job messing it up i think... Broke 3 exhausts clean off and bent at least 4... Off to strip and rebuild the head now. Fingers crossed the guides will be ok.
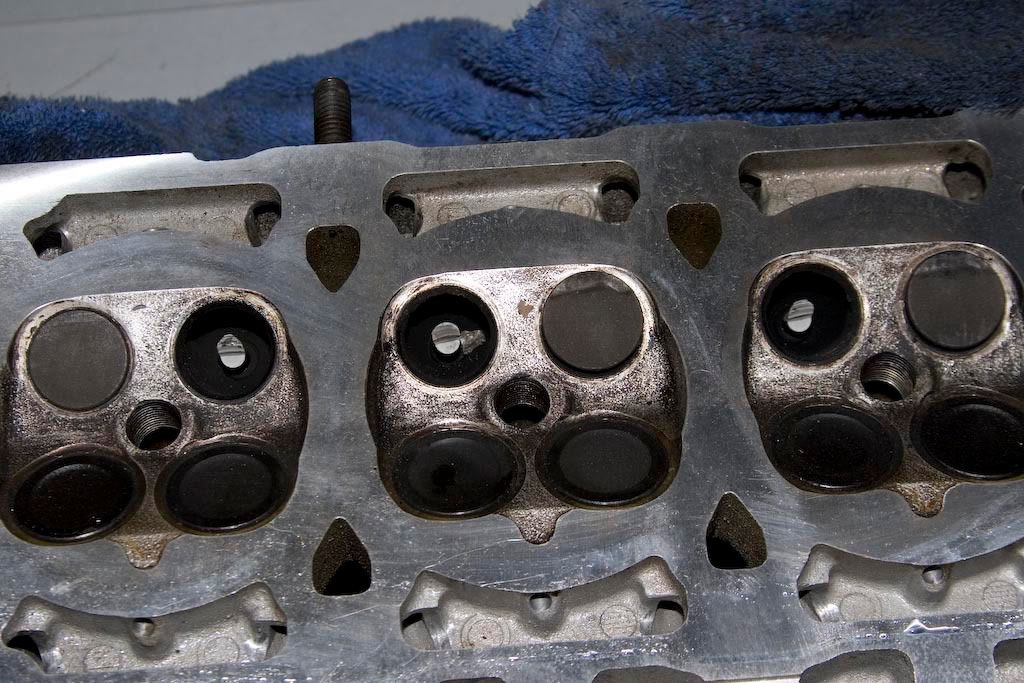
Cheers to robin for the valve compressor and stu for the valves! Note stu's wonderfull skimming work
PS Stu, i think those kent verniers you showed me yesterday were 90 degrees out
Cheers to robin for the valve compressor and stu for the valves! Note stu's wonderfull skimming work
PS Stu, i think those kent verniers you showed me yesterday were 90 degrees out
Arriving broadside, in a cloud of smoke......

Re: Coolant temp problems - Confirmed HGF
Top job Steve
Is it going back together ok?
Stuart
Is it going back together ok?
Stuart
S1 S160
Caterham 310R
Caterham 310R
-
steve_weegie
- Posts: 3249
- Joined: Tue Jun 28, 2005 12:40 am
- Location: Nessieland
Re: Coolant temp problems - Confirmed HGF
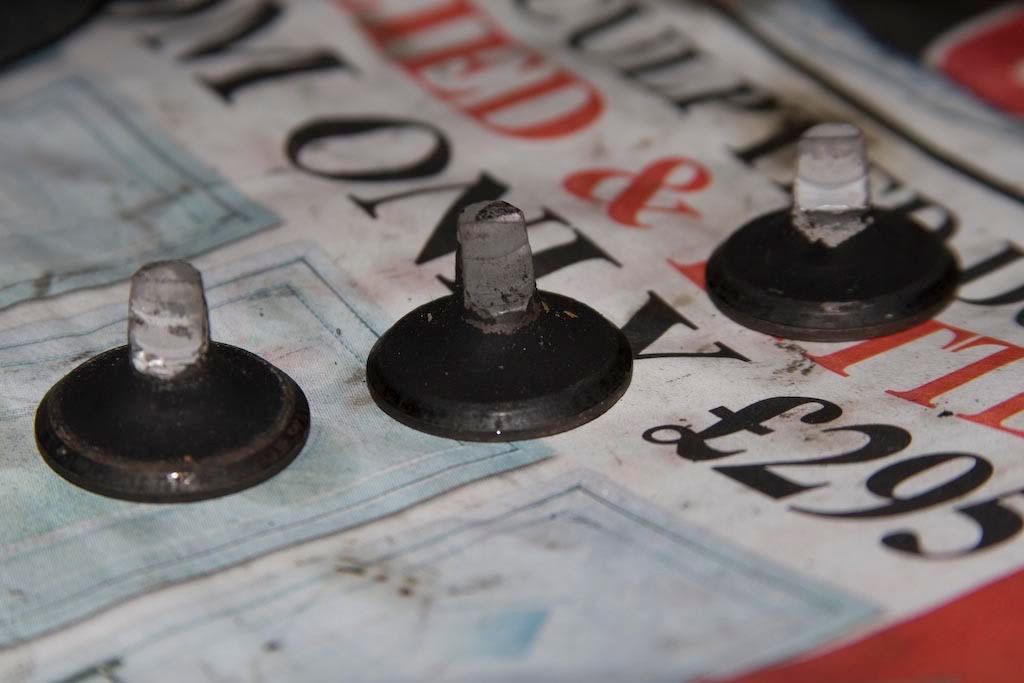
Everything off the head except the bust valves... Trying to figure out how to remove them  Tried pushing against a woodent block under the cyl head but theres not enough stem to contact the wood and pop the collets out past the spring seat.... Dont really want to pull them up through the guides for fear of scoring them badly....
Damn!!
Any top tops from the technical wizards??
Cheers,
Steve
Damn!!
Any top tops from the technical wizards??
Cheers,
Steve
Arriving broadside, in a cloud of smoke......
-
steve_weegie
- Posts: 3249
- Joined: Tue Jun 28, 2005 12:40 am
- Location: Nessieland
Re: Coolant temp problems - Confirmed HGF
Sorted!!!! Have em all out in 2 mins
Arriving broadside, in a cloud of smoke......
Re: Coolant temp problems - Confirmed HGF
Good man,you will be up and running in no time.
Stu
Stu
S1 S160
Caterham 310R
Caterham 310R
-
steve_weegie
- Posts: 3249
- Joined: Tue Jun 28, 2005 12:40 am
- Location: Nessieland
Re: Coolant temp problems - Confirmed HGF
Well, as Rich says valve lapping is a drag and a half! A lot of the valves have some pit marks right in the seat area and I'm not going to fit them until i've done the best lapping job i can.... This is going to take time.... Gotta throw in the towel for tonight and start again tomorrow. I was hoping to put the head on the car tomorrow, but am going to concentrate on getting it as good as I can instead. Inlets look ok, but i'm going to pop them out and grind them back in just to be thorough.
Not gonna make the run at the weekend.... Lets hope the second run I try and organise actually has me on it
Cheers for the words of encouragement gents
Not gonna make the run at the weekend.... Lets hope the second run I try and organise actually has me on it
Cheers for the words of encouragement gents
Arriving broadside, in a cloud of smoke......
Re: Coolant temp problems - Confirmed HGF
I got sick of it and cheated.
I stuck my swizzly sucker valve stick (Make of that what you will....) in the drill and wizzed them in. Just keep lifting them and adding more paste as it gets squeezed out more quickly than doing it by hand. Sorted in a few mins each.
I have the correct sized hand reamer here for doing the valve guides if you want. I'll post it up if you need. There should be no cutting of the valve guide just cleaning them out.
RIch
1994 Lotus Esprit S4 - Work in progress
1980 Porsche 924 Turbo - Funky Interior Spec
2004 Smart Roadster Coupe - Hers
1980 Porsche 924 Turbo - Funky Interior Spec
2004 Smart Roadster Coupe - Hers
-
steve_weegie
- Posts: 3249
- Joined: Tue Jun 28, 2005 12:40 am
- Location: Nessieland
Re: Coolant temp problems - Confirmed HGF
I looked into cheating too Unfortunately the chuck on the dremmel is too small to fit the valve stem in, my drill wont reach the stem and the chuck on the drill is too small to hold the swizzly sucker valve stick Putting thinking cap on again 
Ta for the reamer offer Rich, but ive got to have the head thing reassembled tonight for lifting onto the car tomorrow. I'll give the guides an inspection tonight - if there's any deposits in there i'll see if i can clean them up a bit using a small drill bit.
Cheers,
Steve
Ta for the reamer offer Rich, but ive got to have the head thing reassembled tonight for lifting onto the car tomorrow. I'll give the guides an inspection tonight - if there's any deposits in there i'll see if i can clean them up a bit using a small drill bit.
Cheers,
Steve
Arriving broadside, in a cloud of smoke......
-
steve_weegie
- Posts: 3249
- Joined: Tue Jun 28, 2005 12:40 am
- Location: Nessieland
Re:
robin wrote:
Whip off head.
Close eyes.
Refit head with new gasket.
Run away.
Machargs only had the MLS shim, and would only supply that as part of a head set that included the bottom oil rail. This was £120!
Now.... Where did i put those mindless optimism pills??? Aah, there they are!
It'll be fine! I can move the head gasket to a point where it sits away from the newly formed porosity.... Mostly.....
Arriving broadside, in a cloud of smoke......
Re: Coolant temp problems - Confirmed HGF
You could always ship the head down to DVA and ask him to inspect/hardness test/fit a s/s shim if he thinks it will be worth it? Given that the value of the head is zero at present I would think it'll cost you 20 quid to ship it down, 20 quid the other way - probably money well spent. Failing that, anyone know anything about hardness testing? Would be good to get a local place that can do it ...
Cheers,
Robin
Cheers,
Robin
I is in your loomz nibblin ur wirez
#bemoretut
#bemoretut
-
BiggestNizzy

- Posts: 8932
- Joined: Sun May 27, 2007 6:47 pm
- Location: Kilmarnock
- Contact:
Re: Coolant temp problems - Confirmed HGF
you use a brunell hardness test kit to check it for hardness, you force a ball bearing into it and make a dimple (somewhere that doesn't matter) then you measure the diameter of the indentation using a eye thingy (highly technical terms these) and that tells you the hardness.
We have one at work.
im sure something could be arranged
We have one at work.
im sure something could be arranged
Sent from my ZX SPECTRUM +2A
Re: Coolant temp problems - Confirmed HGF
The local tech college should be able to do it. We may do it here at work, in the Lab, I've no idea. can ask on Monday.
Re: Coolant temp problems - Confirmed HGF
Do you have your Brinnell hardness tester calibrated? I think the alloy in the head is pretty soft at the best of times, so the tester needs to be accurate to avoid condemning good heads/passing duff ones. From a quick bit of research I think that 95 is the minimum acceptable, with 100 being preferable and a new head being 110-120.BiggestNizzy wrote:you use a brunell hardness test kit to check it for hardness, you force a ball bearing into it and make a dimple (somewhere that doesn't matter) then you measure the diameter of the indentation using a eye thingy (highly technical terms these) and that tells you the hardness.
We have one at work.
im sure something could be arranged
Steve, the second paragraph makes me think you're pissing in the wind with your current head ...Dr Dave wrote: You measure the hardness with a hardness tester :doh: , a Leeb rebound tester will do the trick or you can do it with a destructive type tester which uses a fixed force to push a carbide ball into the surface and then you measure the size of the indentation.
A good visual indicator is the presence of *any* indetation on the fire face surface, especially at the fire ring. This will indicate that the surface is soft, you cannot just skim these indentations out since the metal has lost it's temper and become annealed.
On the plus side, it gives you time to remove the pistons, rods & liners and get the block face "linished" to correct the liner heights, while you away and source a replacement head
Cheers,
Robin
I is in your loomz nibblin ur wirez
#bemoretut
#bemoretut