Duratec in detail
-
mwmackenzie

- Posts: 4314
- Joined: Thu Feb 22, 2007 10:22 pm
- Location: Edinburgh
Re: Duratec in detail
Loving your work, really interesting thread, I'm just missing the music on the second vid 
Mark MacKenzie
BMW Z4 3.0si, [R14 MMK] To be Ring ready soon
Merc family hack [R4 MMK] 85% MacKenzie'd Family Spec
BMW Z4 3.0si, [R14 MMK] To be Ring ready soon
Merc family hack [R4 MMK] 85% MacKenzie'd Family Spec

Re: Duratec in detail
Just an update which is a cut and paste job from my FB page https://www.facebook.com/Duratec.in.detail. It is a little easier (quicker) to host pictures there so that's now my master thread. But I will update this every now and then for those who don't use Facebook.
Stripping the new engine:
The pulley bolt first - this proved to be exceptionally tight. I've done a few now, but this one had dry threads and was the tightest I've come across. The holding tool fabricated on my last rebuild worked well and the 3/4'' socket with the 3 foot breaker bar wasn't going to be defeated.

I've never worked on a zero hour engine before so when I opened it up I was surprised to find it bone dry - no assembly lubricant to be seen anywhere! Even a hint of corrosion on the lifters. Those first few seconds on a new engine must be a tough time.

Another good hour this afternoon saw the strip down completed. It has clearly been built by a different operator from the head as it was swimming in oil Bores where honed to a higher finish than I expected and I am delighted with the quality of the bits that will be the basis of the new engine. More photos and details tomorrow.
With the engine stripped down, I could compare the bits that need replaced. Supertech pistons and Carillo rods (right) will replace the cast Ford items (left), both are forged items and apart from being stronger and better quality, they are 100 grams lighter.

An interesting feature on the Ford rods are the sheared bearing caps. The rods are cast in one piece and then 'broken'. I guess it makes them cheaper to manufacture and provides a nice 'keyed' joint

Heat management in pistons is something that you don't necessarily think about but there are some interesting books on the subject. Here the Carillo piston uses the traditional method of oil hole position to help create a thermal break to the skirt, while Ford seem to have inlaid a different material, the oil drains being notches at the side - presumably to keep the strength of the weaker cast piston.
The ring height is also slightly lower on the Carillo piston - I guess to allow it to run in a worn bore. Something that had worried me and one of the reasons I went for a new engine. You live and learn!

The standard shells come in three grades (sizes) red, blue and green. There's about 0.004 mm (0.1 thou) between them. They mix and match the grades to get the optimum clearance to compensate for manufacturing tolerances - this big end uses one blue and one red. All the others where fitted with blue which is the nominal size. The up-rated VP2 bearings that I will use come in the nominal size. The increased tolerance deemed to be acceptable on a rebuilt performance engine.

The grading system is not just confined to bearings shells. The pistons are also made in three grades 1, 2, & 3 to give optimum fit to the bore. All four piston on this engine where grade 2 as seen by the pink pen and etched number. The Supertech is a 12.5:1 CR so has a proud crown and pockets for the value as both the lift and timing would otherwise cause contact. Again the replacement Supertech Pistons all come in the nominal size.

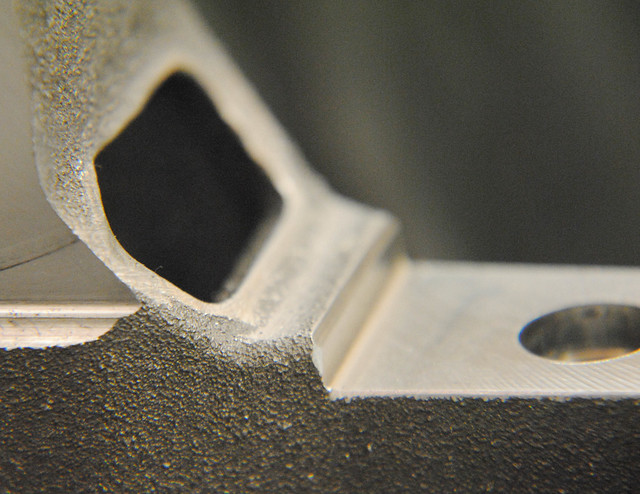
A Cosworth build manual for the CR260 was kindly forwarded to me. One thing I noted in it was that they de-burred the block casting. It was only when I started looking closely at my casting that I thought they had a point. This photo shows the finish - clearly Ford think it is acceptable. It probably is in most cases, but bits could break away and this 'bit' would not do the oil pump much good. So I'll de-burr the block as suggested.

Stripping the new engine:
The pulley bolt first - this proved to be exceptionally tight. I've done a few now, but this one had dry threads and was the tightest I've come across. The holding tool fabricated on my last rebuild worked well and the 3/4'' socket with the 3 foot breaker bar wasn't going to be defeated.
I've never worked on a zero hour engine before so when I opened it up I was surprised to find it bone dry - no assembly lubricant to be seen anywhere! Even a hint of corrosion on the lifters. Those first few seconds on a new engine must be a tough time.
Another good hour this afternoon saw the strip down completed. It has clearly been built by a different operator from the head as it was swimming in oil
With the engine stripped down, I could compare the bits that need replaced. Supertech pistons and Carillo rods (right) will replace the cast Ford items (left), both are forged items and apart from being stronger and better quality, they are 100 grams lighter.
An interesting feature on the Ford rods are the sheared bearing caps. The rods are cast in one piece and then 'broken'. I guess it makes them cheaper to manufacture and provides a nice 'keyed' joint
Heat management in pistons is something that you don't necessarily think about but there are some interesting books on the subject. Here the Carillo piston uses the traditional method of oil hole position to help create a thermal break to the skirt, while Ford seem to have inlaid a different material, the oil drains being notches at the side - presumably to keep the strength of the weaker cast piston.
The ring height is also slightly lower on the Carillo piston - I guess to allow it to run in a worn bore. Something that had worried me and one of the reasons I went for a new engine. You live and learn!
The standard shells come in three grades (sizes) red, blue and green. There's about 0.004 mm (0.1 thou) between them. They mix and match the grades to get the optimum clearance to compensate for manufacturing tolerances - this big end uses one blue and one red. All the others where fitted with blue which is the nominal size. The up-rated VP2 bearings that I will use come in the nominal size. The increased tolerance deemed to be acceptable on a rebuilt performance engine.
The grading system is not just confined to bearings shells. The pistons are also made in three grades 1, 2, & 3 to give optimum fit to the bore. All four piston on this engine where grade 2 as seen by the pink pen and etched number. The Supertech is a 12.5:1 CR so has a proud crown and pockets for the value as both the lift and timing would otherwise cause contact. Again the replacement Supertech Pistons all come in the nominal size.
A Cosworth build manual for the CR260 was kindly forwarded to me. One thing I noted in it was that they de-burred the block casting. It was only when I started looking closely at my casting that I thought they had a point. This photo shows the finish - clearly Ford think it is acceptable. It probably is in most cases, but bits could break away and this 'bit' would not do the oil pump much good. So I'll de-burr the block as suggested.

Re: Duratec in detail
Nice update!
The BMW 3.2 engines in M3, Z3M and Z4M all use the 'sheared' rod caps too, I also thought it was strange way of doing it but it obviously works!
Suppose the burrs are all part of a mass produced engine, I had to do it on a few parts of my 4g63 build too.
Looking forward to the rest
The BMW 3.2 engines in M3, Z3M and Z4M all use the 'sheared' rod caps too, I also thought it was strange way of doing it but it obviously works!
Suppose the burrs are all part of a mass produced engine, I had to do it on a few parts of my 4g63 build too.
Looking forward to the rest
S1 Elige Audi 1.8T
S1 Elise Honda K20
VW T6.1 family bus
S1 Elise Honda K20
VW T6.1 family bus

Re: Duratec in detail
Great thread so far! Really enjoying it. Well illustrated and nicely explained. Keep the updates coming!

Re: Duratec in detail
Great thread, really interesting stuff. 
S1 Elise - Shed spec
330d - Dog carrying spec
640d - Grown up spec
Astravan Sportive SE - Supervan spec
330d - Dog carrying spec
640d - Grown up spec
Astravan Sportive SE - Supervan spec

Re: Duratec in detail
The Con rods amazed me, I was wondering how they managed to get them to split exactly at the centre line in the bore so each half of the shell fits perfectly. Was guessing they create a stess raiser point in the bore where the want them to part.
Don't know if the above makes sense ......but it did make sense to me, and that's before stating drinking today.
Don't know if the above makes sense ......but it did make sense to me, and that's before stating drinking today.

Re: Duratec in detail
I think they are powder forged? Metal powder is formed in a mould and compressed. This gives the right shape but they are extremely brittle and can be snapped by hand. Then they go for heat treatment which gives then the required strength.
Very cool seeing it done. But then I'm a geek
Very cool seeing it done. But then I'm a geek
Re: Duratec in detail
An update for this week . . .
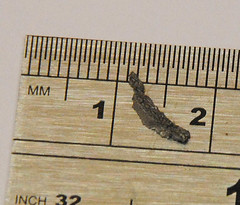
I spent an hour or so de-burring the casting - and I'm glad I did. Lots of pieces were found loosely attached, the biggest bit being pictured below. Because of the number of bits coming off, I decided to extend the de-burring to all areas that I could see. The oil galleries seemed particularly bad. I remember when my R400 was new I found bits in the gauze filter and oil filter (which I cut open to check). I now know where they most likely came from. Their size probably doesn't present any risk to the engine as they are likely to be caught in the filters. But oil can bypass the filter when cold so I'd rather not find out.
The main bearings are graded in the same way as the big end shells but this time their are 13 combined sizes This is a yellow top and brown + brown bottom which represents one grade each side of the nominal size - all the shells where similar sizes. The top bearings are groved and the bottom is plain. I will reuse these bearings as they are new and VP2 upgraded bearings are not available.
The thrust bearing is the middle bearing of the five. The thrust sections are welded to the main bearing and are a snug fit to the crank case bearing web. They are not a precision bearing by any means and have a healthy clearance to the crank. I shall check the spec on assembly. The photo shows them sitting on the cradle with its opposite number - one is a brown + brown, and the other brown.
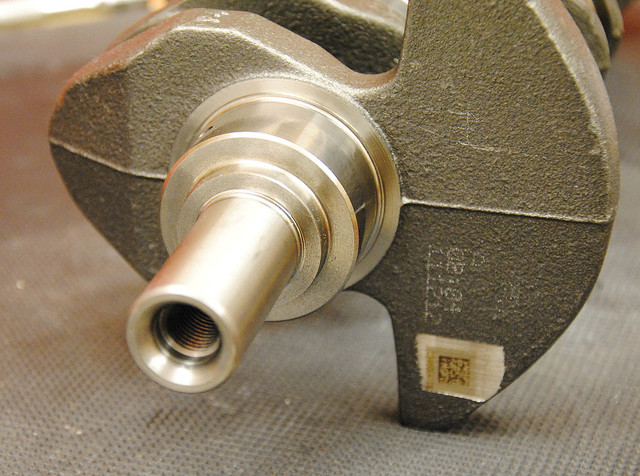
I suppose the crank is pretty ordinary. In the early days it was thought that a steel crank would be needed above 7800 rpm. Some may still argue that's the case but most people now accept that it is safe to 9000 RPM if a key-way is added. I'm confident a that a steel crank would not add anything, and would not be worth the money.
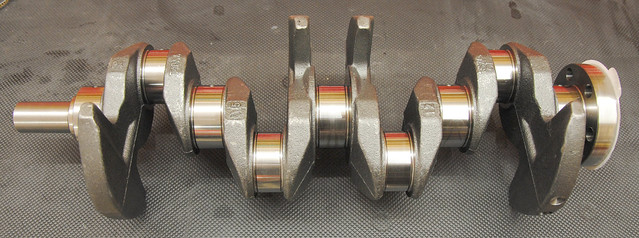
On of the first jobs will be to send off the crank to have a a key cut in the crank. The standard friction washers are OK to 8000 rpm, but once above that, the risk of it slipping is real. That would undoubtedly be a dramatic and costly end to the engine.
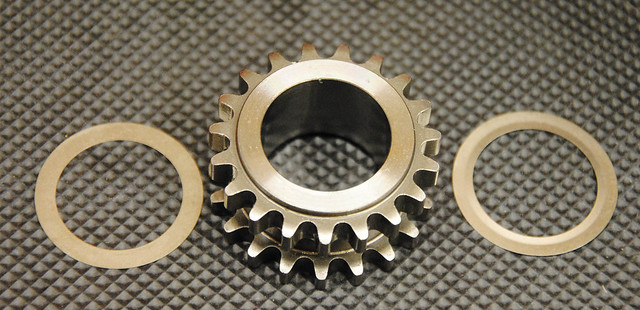
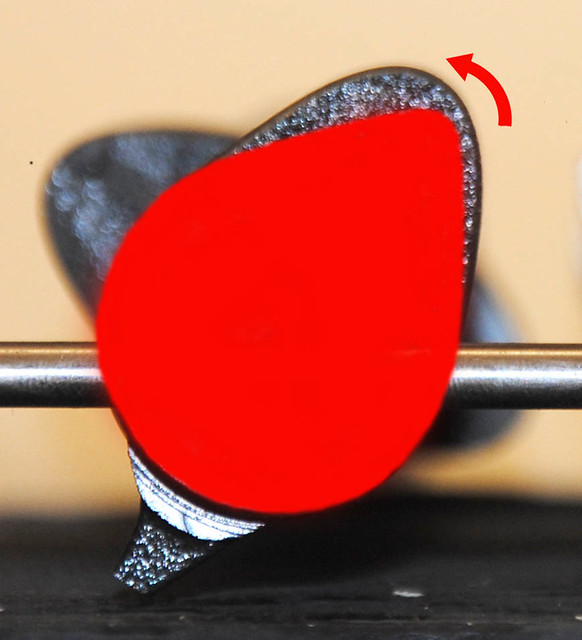
This is a slightly exploded view of the crank pulley. On the standard engine they all get clamped up with two 'friction' washers which can be seen both sides of the sprocket.
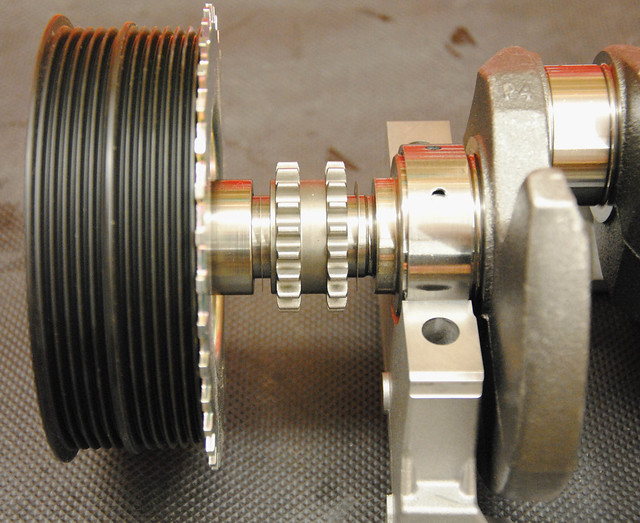
The crank shaft sprocket drives the camshafts from outer teeth, and the oil pump from the inner teeth. The chains are of different sizes. The friction washers have an 'encrusted' finish not unlike a very fine nail file.
Comparing the camshafts: on the right is the standard (145BHP) camshaft and on the left is the UL39 (the bar through the center is just to align the two). The standard is just clamped to its sprocket with a bolt, although a friction washer can be added to 'upgrade' this arrangement. The UL39 is located with a pin (not shown) and has a vernier type sprocket to allow for adjustment.

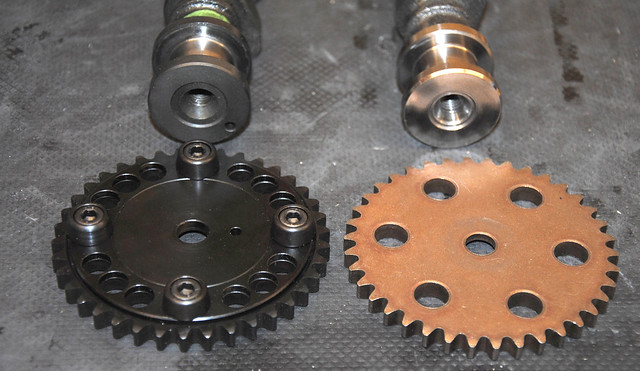
Superimposing the standard inlet cam over the UL39 inlet shows the different profile. The UL39 has a 12.5 mm lift (9 mm std) and is clearly opening earlier and longer.
I spent an hour or so de-burring the casting - and I'm glad I did. Lots of pieces were found loosely attached, the biggest bit being pictured below. Because of the number of bits coming off, I decided to extend the de-burring to all areas that I could see. The oil galleries seemed particularly bad. I remember when my R400 was new I found bits in the gauze filter and oil filter (which I cut open to check). I now know where they most likely came from. Their size probably doesn't present any risk to the engine as they are likely to be caught in the filters. But oil can bypass the filter when cold so I'd rather not find out.
The main bearings are graded in the same way as the big end shells but this time their are 13 combined sizes This is a yellow top and brown + brown bottom which represents one grade each side of the nominal size - all the shells where similar sizes. The top bearings are groved and the bottom is plain. I will reuse these bearings as they are new and VP2 upgraded bearings are not available.
The thrust bearing is the middle bearing of the five. The thrust sections are welded to the main bearing and are a snug fit to the crank case bearing web. They are not a precision bearing by any means and have a healthy clearance to the crank. I shall check the spec on assembly. The photo shows them sitting on the cradle with its opposite number - one is a brown + brown, and the other brown.
I suppose the crank is pretty ordinary. In the early days it was thought that a steel crank would be needed above 7800 rpm. Some may still argue that's the case but most people now accept that it is safe to 9000 RPM if a key-way is added. I'm confident a that a steel crank would not add anything, and would not be worth the money.
On of the first jobs will be to send off the crank to have a a key cut in the crank. The standard friction washers are OK to 8000 rpm, but once above that, the risk of it slipping is real. That would undoubtedly be a dramatic and costly end to the engine.
This is a slightly exploded view of the crank pulley. On the standard engine they all get clamped up with two 'friction' washers which can be seen both sides of the sprocket.
The crank shaft sprocket drives the camshafts from outer teeth, and the oil pump from the inner teeth. The chains are of different sizes. The friction washers have an 'encrusted' finish not unlike a very fine nail file.
Comparing the camshafts: on the right is the standard (145BHP) camshaft and on the left is the UL39 (the bar through the center is just to align the two). The standard is just clamped to its sprocket with a bolt, although a friction washer can be added to 'upgrade' this arrangement. The UL39 is located with a pin (not shown) and has a vernier type sprocket to allow for adjustment.
Superimposing the standard inlet cam over the UL39 inlet shows the different profile. The UL39 has a 12.5 mm lift (9 mm std) and is clearly opening earlier and longer.

Re: Duratec in detail
Nice thread David, following with interest. Can I ask where you sourced the create engine, sorry if I missed you mentioning where earlier.
Elise S2 260
Audi RS3
RRS HST
Triumph Trident 660
Triumph Speed Triple 1200RX
Audi RS3
RRS HST
Triumph Trident 660
Triumph Speed Triple 1200RX
Re: Duratec in detail
There seems to be a stockpile of crate engines at Ford and most suppliers can get them within a few days. This one was bought from Burton Power as it was the best price I could find. One nice thing about the Duratec is that there is very little variation on the internals, so this one is just a standard Duratec replacement engine, sometimes sold as a 'tuner' engine. The 2.3L engine is a little more tricky to source as some have balance shafts and some don't.Mikie711 wrote:Nice thread David, following with interest. Can I ask where you sourced the create engine, sorry if I missed you mentioning where earlier.
Re: Duratec in detail
I have heard that Ford have stopped making the Duratec now as their new engine is the ecotec. Basically a turbocharged duratec.
I am also looking at Burton for the supply of an engine. their price is a cheap as anyone and being a big (ish) supplier more likely to get one in the time stated on their site.
I am also looking at Burton for the supply of an engine. their price is a cheap as anyone and being a big (ish) supplier more likely to get one in the time stated on their site.
Elise S2 260
Audi RS3
RRS HST
Triumph Trident 660
Triumph Speed Triple 1200RX
Audi RS3
RRS HST
Triumph Trident 660
Triumph Speed Triple 1200RX
Re: Duratec in detail
Here's a couple I missed
This is a comparison of Ultimate's Performance CNC phase 2 with the standard Ford head. It speaks for its self.

This is a comparison of Ultimate's Performance CNC phase 2 with the standard Ford head. It speaks for its self.
Re: Duratec in detail
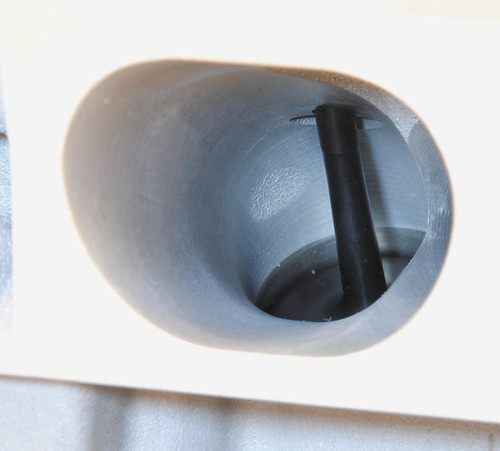
With the crank sent off to be keyed and a load of parts on order, I spent some time looking at the block in more detail. These little ‘squirters’ hide on top of the main bearing journals and spray oil onto the pistons and bores when the oil pressure is high enough. They have spring loaded ball bearing valves in them.

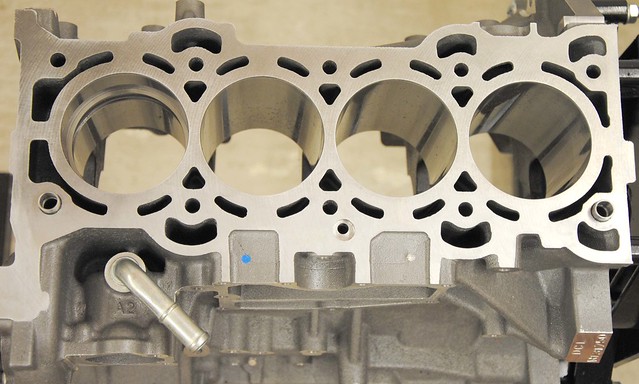
Duratec is a very straightforward 'back to basics' type engine. But look how they put the 'basics together! The complexity in the block casting, particularly in the voids, is outstanding - Just look how the liners meet the head surface to provide a trouble free gasket surface.

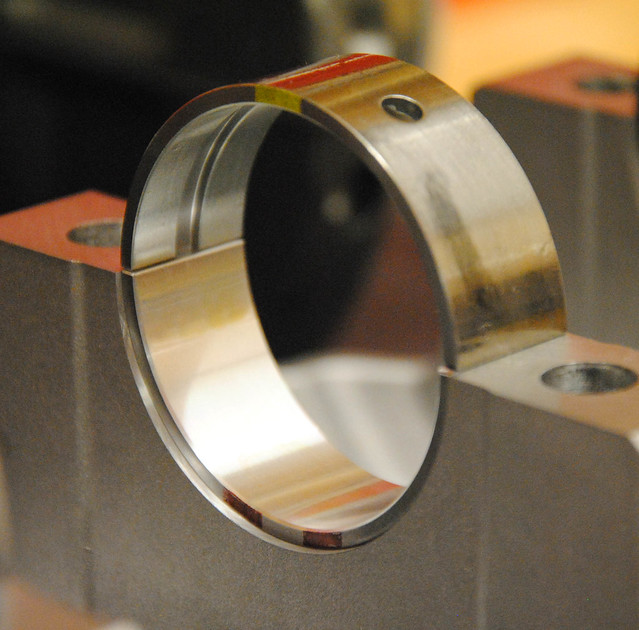
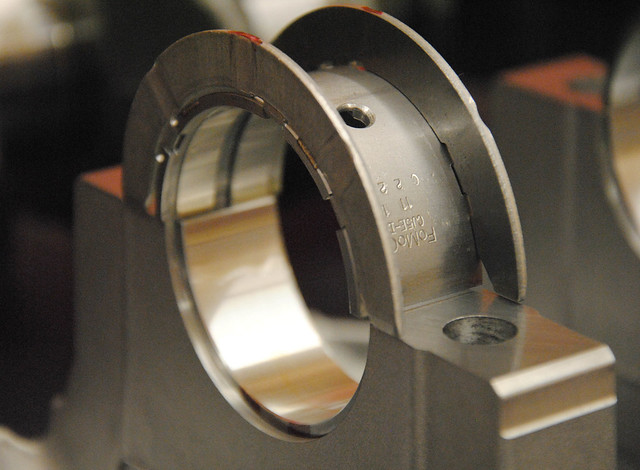
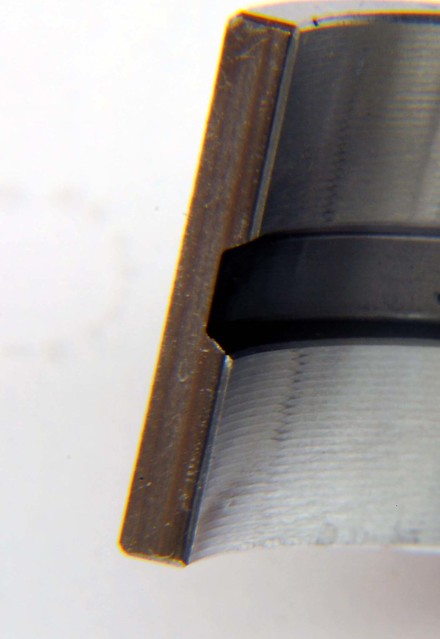
As I mentioned in a previous post, uprated main bearings are not readily available for the Duratec. The preferred option is to use the Ford graded bearing. This picture offers a clue as to why this may be - the bearing material is VERY thin. No doubt the this adds significantly to the structural strength of the bearing, but does show the importance of those 13 possible grade options to get the tolerances correct.
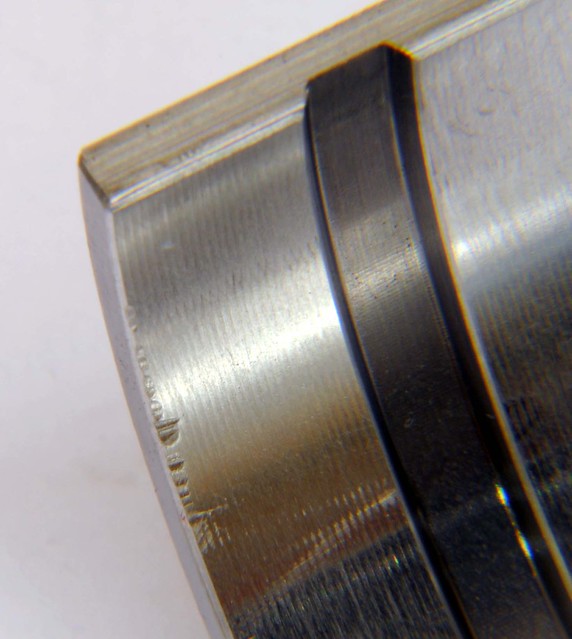
One disappointment when examining the bearings was to see that some had suffered minor hammer marks and scuffing. I'm 100% confident this damage happened during or before the original assembly, and my experience suggest it's irrelevant, but when you aiming for a perfect build it is unwelcome
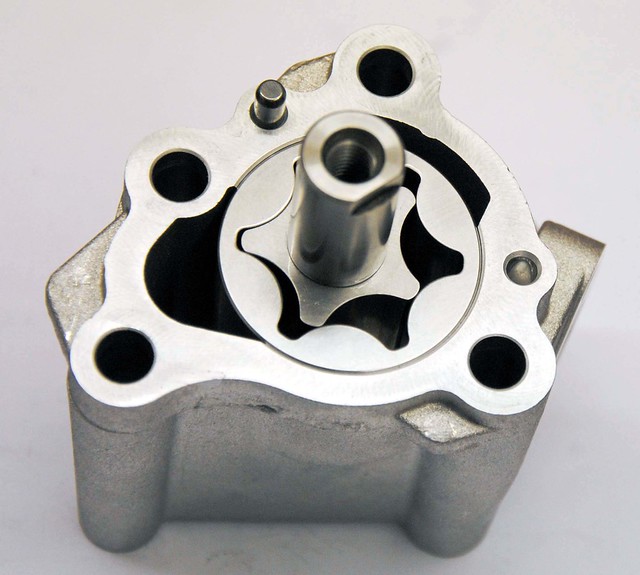
The oil pump is a fairly standard rota type. As I am using a Cosworth dry sump I’ll be using the internal oil pump. The jury is still out on whether I upgrade to a high volume version.
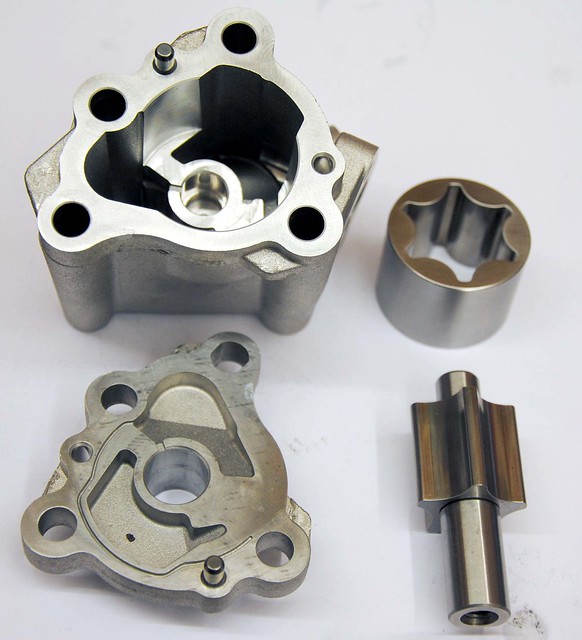
Anyone who has pushed a Duratec for a long track session will have seen that oil pressure can take a dive - but it usually recovers quickly. One theory is that the block expands and allowing more oil to escape from the mains. The more I look at the overall oil system, the more I realise that the main bearings (and their tight tolerances) are key to this engine’s success.
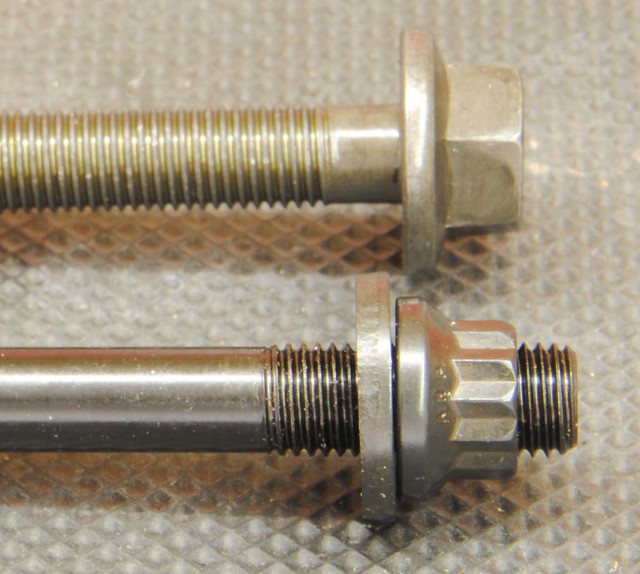
While on the subject of oil pressure, it is worth saying that the main studs will be replaced with ARP versions. Their increased strength over the standard bolt help to hold the bearing together and play their part in maintaining tolerance and the oil pressure. At £16 a bolt, they're expensive but probably worth every penny.
In the next post, I hope to start assembly - you can follow day to day stuff on https://www.facebook.com/Duratec.in.detail
Duratec is a very straightforward 'back to basics' type engine. But look how they put the 'basics together! The complexity in the block casting, particularly in the voids, is outstanding - Just look how the liners meet the head surface to provide a trouble free gasket surface.
As I mentioned in a previous post, uprated main bearings are not readily available for the Duratec. The preferred option is to use the Ford graded bearing. This picture offers a clue as to why this may be - the bearing material is VERY thin. No doubt the this adds significantly to the structural strength of the bearing, but does show the importance of those 13 possible grade options to get the tolerances correct.
One disappointment when examining the bearings was to see that some had suffered minor hammer marks and scuffing. I'm 100% confident this damage happened during or before the original assembly, and my experience suggest it's irrelevant, but when you aiming for a perfect build it is unwelcome
The oil pump is a fairly standard rota type. As I am using a Cosworth dry sump I’ll be using the internal oil pump. The jury is still out on whether I upgrade to a high volume version.
Anyone who has pushed a Duratec for a long track session will have seen that oil pressure can take a dive - but it usually recovers quickly. One theory is that the block expands and allowing more oil to escape from the mains. The more I look at the overall oil system, the more I realise that the main bearings (and their tight tolerances) are key to this engine’s success.
While on the subject of oil pressure, it is worth saying that the main studs will be replaced with ARP versions. Their increased strength over the standard bolt help to hold the bearing together and play their part in maintaining tolerance and the oil pressure. At £16 a bolt, they're expensive but probably worth every penny.
In the next post, I hope to start assembly - you can follow day to day stuff on https://www.facebook.com/Duratec.in.detail

Re: Duratec in detail
I am sure they are ... I believe that the load on the bolts increase in proportion to the square of the frequency, so moving the red line from 7K to 8K increases the load on the bolts by 30%!David wrote:At £16 a bolt, they're expensive but probably worth every penny.
Do they need a stretch gauge to tighten, or is a simple (but accurate) torque wrench adequate?
Cheers,
Robin
I is in your loomz nibblin ur wirez
#bemoretut
#bemoretut
Re: Duratec in detail
robin wrote:
Do they need a stretch gauge to tighten, or is a simple (but accurate) torque wrench adequate?
ARP's preferred method is a stretch gauge, but these are studs, so only one end is accessible. In this case, they quote a torque setting using their lubricant. The procedure is to tighten and loosen them 3 times (in their sequence) before the final torque. I will calibrate my torque wrench setting prior to doing them up.
Edit to add: Unlike the original bolts, the ARP are not 'stretch' type bolts and do return to there original length if not over stressed - I'll keep a log of them so that they can be reused if still in spec.