WAS:Front end refurb NOW:Suspension rebuild, rad and gearbox

Re: WAS:Front end refurb NOW:Suspension rebuild, rad and gea
The place in Newhouse was much more straightforward! Not so much fun though.
If you're not living on the edge you're wasting too much space!

Re: WAS:Front end refurb NOW:Suspension rebuild, rad and gea
I might well end up using them, the 3 hour round trip and chance to play around put me off 
'16 MINI Cooper S - Family fun hatch
'98 Lotus Elise - Fun day car
'04 Maserati Coupe GT - Manual, v8, Italian...
'18 Mazda Mx5 - The wife's, so naturally my daily
'19 Ducati Monster 797 - Baby bike bike
'98 Lotus Elise - Fun day car
'04 Maserati Coupe GT - Manual, v8, Italian...
'18 Mazda Mx5 - The wife's, so naturally my daily
'19 Ducati Monster 797 - Baby bike bike
Re: WAS:Front end refurb NOW:Suspension rebuild, rad and gea
Good effort! Keep the updates coming 
Re: WAS:Front end refurb NOW:Suspension rebuild, rad and gea
Absolutely!
No progress this week so far as I'm feeling a bit under the weather.
On the flip side of things, my 'pocket money' Porsche just passed it's first MOT with me, with flying colours (and a treatment for emissions..) so at least I'll have something fun to play with when the Elise is inevitably still in 100 bits come the summer
'16 MINI Cooper S - Family fun hatch
'98 Lotus Elise - Fun day car
'04 Maserati Coupe GT - Manual, v8, Italian...
'18 Mazda Mx5 - The wife's, so naturally my daily
'19 Ducati Monster 797 - Baby bike bike
'98 Lotus Elise - Fun day car
'04 Maserati Coupe GT - Manual, v8, Italian...
'18 Mazda Mx5 - The wife's, so naturally my daily
'19 Ducati Monster 797 - Baby bike bike
-
thesurfbus
- Posts: 202
- Joined: Tue Jun 26, 2012 11:06 am
- Location: Midlothian
Re: WAS:Front end refurb NOW:Suspension rebuild, rad and gea
FYI its costing £50 to shot blast and powdercoat, the 4 front wishbones, 2 shock brackets and the ARB on my S1, (forgot about my steering arms, taking them in today).
Lotus Elise 220 S
-
thesurfbus
- Posts: 202
- Joined: Tue Jun 26, 2012 11:06 am
- Location: Midlothian
Re: WAS:Front end refurb NOW:Suspension rebuild, rad and gea
Can the Towing bracket be replaced with the clam on?
Lotus Elise 220 S
Re: WAS:Front end refurb NOW:Suspension rebuild, rad and gea
I'm certain that the towing bracket requires the clam to come off, I see
It's definitely worth doing, if you see the state of mine a couple of pages ago, and Woody's in another thread. Attempting to tow on either of ours would have meant it pulling straight through the clam
It's definitely worth doing, if you see the state of mine a couple of pages ago, and Woody's in another thread. Attempting to tow on either of ours would have meant it pulling straight through the clam
'16 MINI Cooper S - Family fun hatch
'98 Lotus Elise - Fun day car
'04 Maserati Coupe GT - Manual, v8, Italian...
'18 Mazda Mx5 - The wife's, so naturally my daily
'19 Ducati Monster 797 - Baby bike bike
'98 Lotus Elise - Fun day car
'04 Maserati Coupe GT - Manual, v8, Italian...
'18 Mazda Mx5 - The wife's, so naturally my daily
'19 Ducati Monster 797 - Baby bike bike
Re: WAS:Front end refurb NOW:Suspension rebuild, rad and gea
Can you get them re plated and powder coated for extra peace of mind?
If you're not living on the edge you're wasting too much space!
Re: WAS:Front end refurb NOW:Suspension rebuild, rad and gea
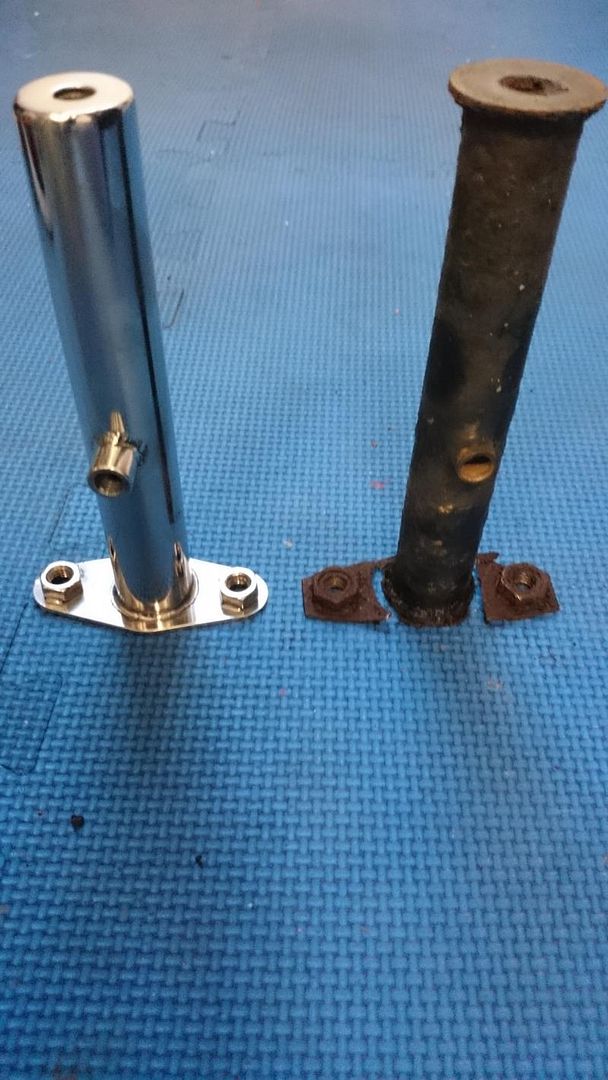
The towing bracket will likely be rotten through at the top and bottom 'T' pieces. I replaced with a stainless steel one.Stephen wrote:Can you get them re plated and powder coated for extra peace of mind?
I bought one of these:
http://www.ebay.co.uk/itm/Lotus-Elise-E ... 339ebc1e13
'16 MINI Cooper S - Family fun hatch
'98 Lotus Elise - Fun day car
'04 Maserati Coupe GT - Manual, v8, Italian...
'18 Mazda Mx5 - The wife's, so naturally my daily
'19 Ducati Monster 797 - Baby bike bike
'98 Lotus Elise - Fun day car
'04 Maserati Coupe GT - Manual, v8, Italian...
'18 Mazda Mx5 - The wife's, so naturally my daily
'19 Ducati Monster 797 - Baby bike bike
Re: WAS:Front end refurb NOW:Suspension rebuild, rad and gea
I have heard others say that it is a clam off job. It might be possible to access the bottom two bolts if you remove the front undertray, to give you access to the underside of the crash structure. You would also need access to the top side of the crash structure. I doubt you would get past the radiator, but might be worth investigating.thesurfbus wrote:Can the Towing bracket be replaced with the clam on?
for ref, here is my old (which I thought was fine till I removed it) and new towing posts;
Re: WAS:Front end refurb NOW:Suspension rebuild, rad and gea
Unfortunately what happens when they fail being used means you'll need to take the clam off afterwards anyway. May as well do it in advance. /VOE and all that.
Re: WAS:Front end refurb NOW:Suspension rebuild, rad and gea
Some progress!
Basically, I've not been too well recently (asthma cough which has lasted a few weeks) so haven't been working on the car
Today, I felt I have to make SOME progress as it's now looking like it's going to take forever!
Since I'm still not 100%, I decided to take it easy and do some tidying up of of the things I'd been putting off.
So - coin trays vs. hole saw. Earlier in the thread, I was asking about ways to get into the sill in order to recover the front clam fixings. I decided that the hole saw approach wasn't for me, so back to the coin trays.
I started with a heat gun to hopefully soften up the entire cylinder of sikaflex that Lotus apparently use, and used a well used (ie sharp) wallpaper scraper, and a hammer..

I found the best method was to get 1 corner of the scraper in, which seemed easier, then to slide it around 90 degrees and push towards the front of the car. I then pull the scraper back, move it across maybe 1cm and repeat, this cutting through the sikaflex a little at a time. Eventually I had to get the hammer involved as my pushing wasn't moving it any more.
Note that the sikaflex is only on the alloy sill top, not the fibreglass. Here is a nice photo of the whole tube of sikaflex
The thing on the left of the photo is the bottom of the coin tray!

I then stuck my hand in and had a feel as the 2 bolts were still fixed in the sill. I'd read that they were just nuts held by more sikaflex, but they seemed too hard to me...
I felt sikaflex, so got back to trying to force them out...
On the left is what the captive nut looks like with no sikaflex. On the right is seemingly another tube of sikaflex attached to a nut

It actually took some fibre off with it too!

I then used a hoover to suck out the stuff in the bottom of the sill, including the clam fixings and the rubber bit from the inner wheel arch cover.
I also found an NCP season pass from a previous owner

Same technique on the passenger side, didn't bother with the heat gun though - it was just as easy!
.and the compulsory gratuitous sikaflex photo:

and finally for this job, I fitted some rivnuts on both sides.

I also did some more chassis cleaning, but didn't take any photos
Whilst all this was going on, my rear wishbone was in the water with bicarb again..
I didn't take any before photos, but you can get the idea from earlier photos in this thread.

Shiny!

The rust left on it can be flicked off really easily, though I'm actually using some fine scotch pads rather than my nails as in this photo
This is after removing from the liquid, and rinsing off the wishbone.

My issues are:
It takes a while.
It's not uniform, though more time with the electrolysis would sort that, and more patience with the scotch pad too.
It sort of uses 'line of sight' I(well, the current flows from wishbone to collector (copper pipe with a brake disk sitting on it now) in such a way that the side facing the collector is done quicker I guess, so will take longer
Did I mention it takes ages - that wishbone has been in attached to a 6 amp charger for maybe 3 hours first time around, and now attached to a duff battery (ie, not providing enough amps to start a car, but still holding 12+ volts) for maybe another 3 hours today.
I'm leaning towards just having them acid dipped and plated professionally due to this, though I think for something smaller than a wishbone the DIY method would be perfect.
Basically, I've not been too well recently (asthma cough which has lasted a few weeks) so haven't been working on the car
Today, I felt I have to make SOME progress as it's now looking like it's going to take forever!
Since I'm still not 100%, I decided to take it easy and do some tidying up of of the things I'd been putting off.
So - coin trays vs. hole saw. Earlier in the thread, I was asking about ways to get into the sill in order to recover the front clam fixings. I decided that the hole saw approach wasn't for me, so back to the coin trays.
I started with a heat gun to hopefully soften up the entire cylinder of sikaflex that Lotus apparently use, and used a well used (ie sharp) wallpaper scraper, and a hammer..
I found the best method was to get 1 corner of the scraper in, which seemed easier, then to slide it around 90 degrees and push towards the front of the car. I then pull the scraper back, move it across maybe 1cm and repeat, this cutting through the sikaflex a little at a time. Eventually I had to get the hammer involved as my pushing wasn't moving it any more.
Note that the sikaflex is only on the alloy sill top, not the fibreglass. Here is a nice photo of the whole tube of sikaflex
The thing on the left of the photo is the bottom of the coin tray!
I then stuck my hand in and had a feel as the 2 bolts were still fixed in the sill. I'd read that they were just nuts held by more sikaflex, but they seemed too hard to me...
I felt sikaflex, so got back to trying to force them out...
On the left is what the captive nut looks like with no sikaflex. On the right is seemingly another tube of sikaflex attached to a nut
It actually took some fibre off with it too!
I then used a hoover to suck out the stuff in the bottom of the sill, including the clam fixings and the rubber bit from the inner wheel arch cover.
I also found an NCP season pass from a previous owner
Same technique on the passenger side, didn't bother with the heat gun though - it was just as easy!
.and the compulsory gratuitous sikaflex photo:
and finally for this job, I fitted some rivnuts on both sides.
I also did some more chassis cleaning, but didn't take any photos
Whilst all this was going on, my rear wishbone was in the water with bicarb again..
I didn't take any before photos, but you can get the idea from earlier photos in this thread.
Shiny!
The rust left on it can be flicked off really easily, though I'm actually using some fine scotch pads rather than my nails as in this photo
This is after removing from the liquid, and rinsing off the wishbone.
My issues are:
It takes a while.
It's not uniform, though more time with the electrolysis would sort that, and more patience with the scotch pad too.
It sort of uses 'line of sight' I(well, the current flows from wishbone to collector (copper pipe with a brake disk sitting on it now) in such a way that the side facing the collector is done quicker I guess, so will take longer
Did I mention it takes ages - that wishbone has been in attached to a 6 amp charger for maybe 3 hours first time around, and now attached to a duff battery (ie, not providing enough amps to start a car, but still holding 12+ volts) for maybe another 3 hours today.
I'm leaning towards just having them acid dipped and plated professionally due to this, though I think for something smaller than a wishbone the DIY method would be perfect.
'16 MINI Cooper S - Family fun hatch
'98 Lotus Elise - Fun day car
'04 Maserati Coupe GT - Manual, v8, Italian...
'18 Mazda Mx5 - The wife's, so naturally my daily
'19 Ducati Monster 797 - Baby bike bike
'98 Lotus Elise - Fun day car
'04 Maserati Coupe GT - Manual, v8, Italian...
'18 Mazda Mx5 - The wife's, so naturally my daily
'19 Ducati Monster 797 - Baby bike bike
Re: WAS:Front end refurb NOW:Suspension rebuild, rad and gea
Another weekend, and some more progress..
I've been avoiding the gearbox whilst not at 100% health, but have been getting on with some other important bits of my mini-rebuild.
I've been concentrating on wiring, for my heated seats (that I've had for 5 years and never bothered to wire in..) and for my aux radiator fan.
I bought a new set of the same Delphi connectors as used on the original radiator fan so I can switch the fans between manual switch and temp sensor to ensure both can be used relatively regularly. I don't have the £90+ tool for crimping these connectors so had to make to with some small screw drivers, pliers and solder instead. I made this:

I then tested with both of my cans (which are different and spin different ways) and of course one was spinning in reverse. A quick job to remove and reverse the pins in the connector and that was sorted.
Here is new and old with the loom connector.

I then set about fitting the fans to the rad..

The keen eyed amongst you might notice that these fans are riveted to the top of the radiator
so I had to drill out my 16 nice new rivets, turn it over and start again!
This looks better - and fits in the radiator surround much better too

It's sitting upside down on the crash structure of course. You can see the 2 cables coming through the
I also fitted rivnuts on the front 3 and centre rear retaining bolts for the radiator surround (in the crash structure), and on the 4 holes on the actual rad itself. My rivnut gun doesn't fit the left and right rear ones as the brake cables get in the way. Anyone who has done this before will know these as either seized, sheered, grinder or dremel bolts as they get stuck on the spire clips, probably due to the lovely combination of wet / dry / hot / cold that this area of the car gets.
Back to my fan loom, I obviously couldn't just use a connector and 2 bare wires, so I made this:

Assuming I've done my research properly and once connected to the ignition circuit to make the relay live, the fan will operate only when ignition is on and switch is on.
I tested by connecting +ve and vehicle ignition together and connecting to a battery and it nearly works.
Switch off, nothing happens
Switch on, switch illuminates, fan spins, but relay clicks on and off continuously.
Do I have it wired wrongly, or does the vehicle ignition circuit work differently to a main 12v positive feed?
Since I had the soldering iron out, I decided to fix my dodgy wiring bodge shown earlier. On closer inspection, one of the connections to the horn relay was broken.
It looks like this had been repaired originally by: cutting a section out of the broken wire. Soldering a new section of wire into the loom. Fitting a set of spade connectors to the remaining wire.
Over time it looks like this spade connection had corroded away and been replaced by a wire stuffed in below (and held in by) the fuse and relay.
At a guess, this is because getting to the bottom of the fuse box / relay box was difficult due to seized / rusted bolts just turning.
I removed all bodge wires, and set about soldering in a fresh stretch of wire to the loom and relay connector along with some heat shrink to cover everything up neatly.

..and back into the bottom of the relay box

Having also fitted a pair of Hella Supertone horns, I can report that everything works, and is bloody loud too.
I also soldered the wiring harness connectors for the heated seats to the seats, and removed the speakers since the seats are out and they are terrible. I'm not going crazy as ICE in the Elise is for those moments that you end up on a busty road / traffic jam / are going to a fun road, but will get some new shallow 16cm speakers in there, possibly with separate tweaters.
I'm also investigating front speakers rather than coin trays as I have a spare pair of 10cm speakers, and the coin trays are of course currently off.
I've been avoiding the gearbox whilst not at 100% health, but have been getting on with some other important bits of my mini-rebuild.
I've been concentrating on wiring, for my heated seats (that I've had for 5 years and never bothered to wire in..) and for my aux radiator fan.
I bought a new set of the same Delphi connectors as used on the original radiator fan so I can switch the fans between manual switch and temp sensor to ensure both can be used relatively regularly. I don't have the £90+ tool for crimping these connectors so had to make to with some small screw drivers, pliers and solder instead. I made this:
I then tested with both of my cans (which are different and spin different ways) and of course one was spinning in reverse. A quick job to remove and reverse the pins in the connector and that was sorted.
Here is new and old with the loom connector.
I then set about fitting the fans to the rad..
The keen eyed amongst you might notice that these fans are riveted to the top of the radiator
so I had to drill out my 16 nice new rivets, turn it over and start again!
This looks better - and fits in the radiator surround much better too
It's sitting upside down on the crash structure of course. You can see the 2 cables coming through the
I also fitted rivnuts on the front 3 and centre rear retaining bolts for the radiator surround (in the crash structure), and on the 4 holes on the actual rad itself. My rivnut gun doesn't fit the left and right rear ones as the brake cables get in the way. Anyone who has done this before will know these as either seized, sheered, grinder or dremel bolts as they get stuck on the spire clips, probably due to the lovely combination of wet / dry / hot / cold that this area of the car gets.
Back to my fan loom, I obviously couldn't just use a connector and 2 bare wires, so I made this:
Assuming I've done my research properly and once connected to the ignition circuit to make the relay live, the fan will operate only when ignition is on and switch is on.
I tested by connecting +ve and vehicle ignition together and connecting to a battery and it nearly works.
Switch off, nothing happens
Switch on, switch illuminates, fan spins, but relay clicks on and off continuously.
Do I have it wired wrongly, or does the vehicle ignition circuit work differently to a main 12v positive feed?
Since I had the soldering iron out, I decided to fix my dodgy wiring bodge shown earlier. On closer inspection, one of the connections to the horn relay was broken.
It looks like this had been repaired originally by: cutting a section out of the broken wire. Soldering a new section of wire into the loom. Fitting a set of spade connectors to the remaining wire.
Over time it looks like this spade connection had corroded away and been replaced by a wire stuffed in below (and held in by) the fuse and relay.
At a guess, this is because getting to the bottom of the fuse box / relay box was difficult due to seized / rusted bolts just turning.
I removed all bodge wires, and set about soldering in a fresh stretch of wire to the loom and relay connector along with some heat shrink to cover everything up neatly.
..and back into the bottom of the relay box
Having also fitted a pair of Hella Supertone horns, I can report that everything works, and is bloody loud too.
I also soldered the wiring harness connectors for the heated seats to the seats, and removed the speakers since the seats are out and they are terrible. I'm not going crazy as ICE in the Elise is for those moments that you end up on a busty road / traffic jam / are going to a fun road, but will get some new shallow 16cm speakers in there, possibly with separate tweaters.
I'm also investigating front speakers rather than coin trays as I have a spare pair of 10cm speakers, and the coin trays are of course currently off.
'16 MINI Cooper S - Family fun hatch
'98 Lotus Elise - Fun day car
'04 Maserati Coupe GT - Manual, v8, Italian...
'18 Mazda Mx5 - The wife's, so naturally my daily
'19 Ducati Monster 797 - Baby bike bike
'98 Lotus Elise - Fun day car
'04 Maserati Coupe GT - Manual, v8, Italian...
'18 Mazda Mx5 - The wife's, so naturally my daily
'19 Ducati Monster 797 - Baby bike bike
Re: WAS:Front end refurb NOW:Suspension rebuild, rad and gea
So, last week I kept looking at the wiring loom I made for my aux fan. I couldn't see what I had wrong, despite drawing the diagram out a number of times, and reading the specs of the relay over and over. I even resorted to checking each wire with an ammeter and using a different car battery, then on the off chance, I changed out the switch and it worked perfectly Bit of a waste of time then..
Saturday, I decided to stop pissing around and get back to the gearbox.
It was the gearbox mount bolt that I couldn't get free despite plenty of plus gas. It's really awkward to get to meaning only a spanner can get in there, plus it's 13mm so it's not exactly the biggest spanner either! I bought a can of Comma Frost Bite - for freeing up bolts. Basically as an alternative to heating the bolt, you cool it. 8 seconds of spray, and on with the spanner (with another spanner on the end for a little more leverage) and it was free! I'm sure this stuff isn't as good as heat, but it did the job for me on this occasion
All through this I kept looking at the state of my roll bar and thinking about what was said earlier about cleaning it up and painting it. I also wasn't too confident on the way the engine was sitting - on one mount and a jack supporting the sump, so I started some time maths on clam removal...
I figured it was maybe a 90 minute job given the bits of the car that were already off-
No inner wheel arches
No seats (for wiring the heated seat elements)
No speakers (out for replacement)
I managed it alone in an hour..


With the clam off, gearbox access was so much easier, so I'm glad I did.
I took some photos to show which gearbox bolt holes were used and proceeded with removal.

The bottom bolt required dropping the manifold. I could get to it with a spanner from underneath, but it was clear that the bolt would foul on the manifold and not come out compltly.

Then set about getting the bolts out using a combination of 15mm, 17 sockets, long bar and impact wrench.
For those like me, who like to pretend to me mechanics for the day, an impact wrench can be a costly thing, but I did it on the cheap (very much so in fact!)
I bought one of these from eBay..
http://www.ebay.co.uk/itm/231251483768
240v didn't bother me as I only planned to use it in my garage.
It was also on offer when I bought it, only £36.47, minus a £5 eBay voucher I had so £31.47
When it arrived from Germany, the carry box (which stinks of cheap plastic) was broken (one of the clips not holding closed properly) so I emailed them telling them to check their stock before sending someone else one. They asked for some photos and refunded me £8. £23.47 for a working new impact wrench
It comes with a 2 pin Euro plug with a converter loosely bolted on the end, so I chopped that off and wired in a proper UK plug.
Part of the reason I was happy to go with this is that the Machine Mart Clarke 240v Impact Wrench gets decent reviews . It has identical spec to mine, from watts to nm of torque, to external casing, replaceable brushes etc. I've seen the one in Machine Mart and I think it could easily be the same item re-branded.
https://www.machinemart.co.uk/shop/prod ... act-wrench
Anyway, it has undone 5 tight bolts for me, so already it's been worth it imo. I should add I'm using my Halfords Pro impact sockets not the ones supplied with it just in case!
So, once all the bolts were free, there is a nice lever point towards the back / bottom of where the engine meets the box. An old tyre lever in there and I had the box off the dowels pretty easily. With no clam in the way, I was able to easily support and lower the box into a waiting spare wheel (to stop it rolling around and hitting something like a jack!)

At this point, there is a 2nd jack supporting the car on the rear jacking point to allow me to remove the axle stand.
The wheel then became more of a hindrance than anything else, but I managed to manoeuvre the box out of the rear of the car (with no exhaust in the way now!)

and snap some shots of the clutch assembley for future reference!

For now, the engine is supported by an axle stand with wood, plus a jack, and is still on the rightmost mount of course.
I'm sure it'll make fitting the PRRT kit easier too so, and I have a nice new exhaust heat shield to fit too.
Though my garage is a mess now

As we all know, Sunday was glorious, so I took the day off and went to Braemar in the 944. Stopped for some photos which I might post later..
Chris
Saturday, I decided to stop pissing around and get back to the gearbox.
It was the gearbox mount bolt that I couldn't get free despite plenty of plus gas. It's really awkward to get to meaning only a spanner can get in there, plus it's 13mm so it's not exactly the biggest spanner either! I bought a can of Comma Frost Bite - for freeing up bolts. Basically as an alternative to heating the bolt, you cool it. 8 seconds of spray, and on with the spanner (with another spanner on the end for a little more leverage) and it was free! I'm sure this stuff isn't as good as heat, but it did the job for me on this occasion
All through this I kept looking at the state of my roll bar and thinking about what was said earlier about cleaning it up and painting it. I also wasn't too confident on the way the engine was sitting - on one mount and a jack supporting the sump, so I started some time maths on clam removal...
I figured it was maybe a 90 minute job given the bits of the car that were already off-
No inner wheel arches
No seats (for wiring the heated seat elements)
No speakers (out for replacement)
I managed it alone in an hour..
With the clam off, gearbox access was so much easier, so I'm glad I did.
I took some photos to show which gearbox bolt holes were used and proceeded with removal.
The bottom bolt required dropping the manifold. I could get to it with a spanner from underneath, but it was clear that the bolt would foul on the manifold and not come out compltly.
Then set about getting the bolts out using a combination of 15mm, 17 sockets, long bar and impact wrench.
For those like me, who like to pretend to me mechanics for the day, an impact wrench can be a costly thing, but I did it on the cheap (very much so in fact!)
I bought one of these from eBay..
http://www.ebay.co.uk/itm/231251483768
240v didn't bother me as I only planned to use it in my garage.
It was also on offer when I bought it, only £36.47, minus a £5 eBay voucher I had so £31.47
When it arrived from Germany, the carry box (which stinks of cheap plastic) was broken (one of the clips not holding closed properly) so I emailed them telling them to check their stock before sending someone else one. They asked for some photos and refunded me £8. £23.47 for a working new impact wrench
It comes with a 2 pin Euro plug with a converter loosely bolted on the end, so I chopped that off and wired in a proper UK plug.
Part of the reason I was happy to go with this is that the Machine Mart Clarke 240v Impact Wrench gets decent reviews . It has identical spec to mine, from watts to nm of torque, to external casing, replaceable brushes etc. I've seen the one in Machine Mart and I think it could easily be the same item re-branded.
https://www.machinemart.co.uk/shop/prod ... act-wrench
Anyway, it has undone 5 tight bolts for me, so already it's been worth it imo. I should add I'm using my Halfords Pro impact sockets not the ones supplied with it just in case!
So, once all the bolts were free, there is a nice lever point towards the back / bottom of where the engine meets the box. An old tyre lever in there and I had the box off the dowels pretty easily. With no clam in the way, I was able to easily support and lower the box into a waiting spare wheel (to stop it rolling around and hitting something like a jack!)
At this point, there is a 2nd jack supporting the car on the rear jacking point to allow me to remove the axle stand.
The wheel then became more of a hindrance than anything else, but I managed to manoeuvre the box out of the rear of the car (with no exhaust in the way now!)
and snap some shots of the clutch assembley for future reference!
For now, the engine is supported by an axle stand with wood, plus a jack, and is still on the rightmost mount of course.
I'm sure it'll make fitting the PRRT kit easier too so, and I have a nice new exhaust heat shield to fit too.
Though my garage is a mess now
As we all know, Sunday was glorious, so I took the day off and went to Braemar in the 944. Stopped for some photos which I might post later..
Chris
'16 MINI Cooper S - Family fun hatch
'98 Lotus Elise - Fun day car
'04 Maserati Coupe GT - Manual, v8, Italian...
'18 Mazda Mx5 - The wife's, so naturally my daily
'19 Ducati Monster 797 - Baby bike bike
'98 Lotus Elise - Fun day car
'04 Maserati Coupe GT - Manual, v8, Italian...
'18 Mazda Mx5 - The wife's, so naturally my daily
'19 Ducati Monster 797 - Baby bike bike
Re: WAS:Front end refurb NOW:Suspension rebuild, rad and gea
So last night I started fitting the PRRT kit.
Bolts out of the cooling rail, the one on dipstick tube sheered, then I couldn't get the thermostat housing out. I left that for another day!
I then set about fitting the PRRT and pipes. I got as far as a loose fit that I'm not quite happy with (pipe touching one of the thinner metal pipes) so will revisit next time I'm in the garage.
Whilst in there, I had a look at the cam belt area as the car needs the belt changed and noticed that the plastic cover is a little melted...

Does anyone know if the inner cover can be changed with the belt off and pulleys in place, or do the pulleys have to come off too?
Bolts out of the cooling rail, the one on dipstick tube sheered, then I couldn't get the thermostat housing out. I left that for another day!
I then set about fitting the PRRT and pipes. I got as far as a loose fit that I'm not quite happy with (pipe touching one of the thinner metal pipes) so will revisit next time I'm in the garage.
Whilst in there, I had a look at the cam belt area as the car needs the belt changed and noticed that the plastic cover is a little melted...
Does anyone know if the inner cover can be changed with the belt off and pulleys in place, or do the pulleys have to come off too?
'16 MINI Cooper S - Family fun hatch
'98 Lotus Elise - Fun day car
'04 Maserati Coupe GT - Manual, v8, Italian...
'18 Mazda Mx5 - The wife's, so naturally my daily
'19 Ducati Monster 797 - Baby bike bike
'98 Lotus Elise - Fun day car
'04 Maserati Coupe GT - Manual, v8, Italian...
'18 Mazda Mx5 - The wife's, so naturally my daily
'19 Ducati Monster 797 - Baby bike bike