Winter Strip Down and Rebuild (Done and Dusted)

Re: Winter Strip Down and Rebuild
One other quick question, does anybody know which way the K series rotates or which side is the thrust side of the engine?
Elise S2 260
Audi RS3
RRS HST
Triumph Trident 660
Triumph Speed Triple 1200RX
Audi RS3
RRS HST
Triumph Trident 660
Triumph Speed Triple 1200RX
-
steve_weegie

- Posts: 3249
- Joined: Tue Jun 28, 2005 12:40 am
- Location: Nessieland
Re: Winter Strip Down and Rebuild
Yup, if you're looking at the engine front (with the cam drive gear) it will rotate clockwise 
Arriving broadside, in a cloud of smoke......
Re: Winter Strip Down and Rebuild
Thought so, just never thought to look before when it was running. Odd how there is no mention of rotation direction in the manual. Ho hum, cheers Steve. Got your up and running yet?
Elise S2 260
Audi RS3
RRS HST
Triumph Trident 660
Triumph Speed Triple 1200RX
Audi RS3
RRS HST
Triumph Trident 660
Triumph Speed Triple 1200RX
Re: Winter Strip Down and Rebuild
Pretty much every IC engine these days apart from some Honda engines (not the K20) rotate clockwise.Mikie711 wrote:Thought so, just never thought to look before when it was running. Odd how there is no mention of rotation direction in the manual. Ho hum, cheers Steve. Got your up and running yet?
Re: Winter Strip Down and Rebuild
It was designed ans built by Rover, you can't take anything for granted 
Elise S2 260
Audi RS3
RRS HST
Triumph Trident 660
Triumph Speed Triple 1200RX
Audi RS3
RRS HST
Triumph Trident 660
Triumph Speed Triple 1200RX

Re: Winter Strip Down and Rebuild
Unless things have changed, rods and pistons ware fairly straight forward. The lightest rod and piston were the benchmark and the other three were bought down to its weight. They will be done in pairs with weight being taken off the heavier side if it can be measured
I would think that they have a computerised machine to measure rotational imbalance nowadays, but it will still be the same principal of removing weight from the counterbalances or adding it if necessary. Similar story with the flywheel, lightened and balanced.
They should also carry out dynamic balancing, but not sure what that involves. As you have an accurately ported and gas flowed head, you compression ratio between cylinders should match pretty closely. They would also check the camshafts for uneven wear but this will not apply to you.
Used to be called blueprinting but not heard that used for a while.
tut
-
steve_weegie
- Posts: 3249
- Joined: Tue Jun 28, 2005 12:40 am
- Location: Nessieland
Re: Winter Strip Down and Rebuild
Not yet Mike - Car and engine are over with Ali, but he's under instruction not to rush until i get some funds to pay himMikie711 wrote:Thought so, just never thought to look before when it was running. Odd how there is no mention of rotation direction in the manual. Ho hum, cheers Steve. Got your up and running yet?
Arriving broadside, in a cloud of smoke......
Re: Winter Strip Down and Rebuild
Thanks Tut
S2 Elise ST (V6 spec)
Audi A4 Tdi (Shed Spec)
Discovery 3 (Wifes Spec)
Audi A4 Tdi (Shed Spec)
Discovery 3 (Wifes Spec)
Re: Winter Strip Down and Rebuild
Another couple of jobs knocked off the list today. Changed out all the springs on my Nitrons dropping the spring rate 100lbs all round and changing from Nitron springs to Eibach

Once the dampener is off the car and in the vice, wind off the lower spring platform to release the spring tension...............

Turn it upside down (actually the right way up........ but never mind) and remove the circlip

that sits in this groove and retains the upper spring platform and remove it and the old spring.

Old and new side by side.

Took the time to remove the old ARB drop links which was the one job I never managed to do last year when replacing/refreshing the suspension.

The finished article, will of course need to geo the car once she is back together but should improve the ride quality on the road and be plenty stiff enough for the track etc. Reason for changing them was because with the 2 ways I was running hardly any dampening either on the the track or on the road. Having spoken to Nitron it is possible the guy I got the shocks from had them valved differently from standard, will have to wait and see what they feel like now. One point of note was that the new rear springs are 2 inches longer than the old ones which is a bit odd but looks right now with the spring platform nearer the top than the bottom.
Back to Dundee in the morning to pick up my bits & bobs from balancing, so will be building the engine over the next day or two. Away to strip out the pedal box and steering column and fit the new trunion bearings and rack riser plates. Not looking forward to this as the pedal box is a pain in the a**e to get out but needs doing so ho hum.
Also changed out the front calipers for the new ones and overhauled the rears and fitted the PRRT in place.
Once the dampener is off the car and in the vice, wind off the lower spring platform to release the spring tension...............
Turn it upside down (actually the right way up........ but never mind) and remove the circlip
that sits in this groove and retains the upper spring platform and remove it and the old spring.
Old and new side by side.
Took the time to remove the old ARB drop links which was the one job I never managed to do last year when replacing/refreshing the suspension.
The finished article, will of course need to geo the car once she is back together but should improve the ride quality on the road and be plenty stiff enough for the track etc. Reason for changing them was because with the 2 ways I was running hardly any dampening either on the the track or on the road. Having spoken to Nitron it is possible the guy I got the shocks from had them valved differently from standard, will have to wait and see what they feel like now. One point of note was that the new rear springs are 2 inches longer than the old ones which is a bit odd but looks right now with the spring platform nearer the top than the bottom.
Back to Dundee in the morning to pick up my bits & bobs from balancing, so will be building the engine over the next day or two. Away to strip out the pedal box and steering column and fit the new trunion bearings and rack riser plates. Not looking forward to this as the pedal box is a pain in the a**e to get out but needs doing so ho hum.
Also changed out the front calipers for the new ones and overhauled the rears and fitted the PRRT in place.
Elise S2 260
Audi RS3
RRS HST
Triumph Trident 660
Triumph Speed Triple 1200RX
Audi RS3
RRS HST
Triumph Trident 660
Triumph Speed Triple 1200RX
Re: Winter Strip Down and Rebuild
Some more pic's of work done/ in progress.

Rear dampener with longer Eibach, before the top spring platform was about 2 inches above the end of the thread on the body.

PRRT waiting for an engine...............

New front caliper fitted.

After much cursing finally got this bad boy out. Took it out with the brake and clutch cylinders on it because I think it is easier to bleed the brakes/clutch than try and get the cylinders off while upside down in the foot well of the car. Marked up and split the intermediate steering column shaft. Undid the pipes for brakes and clutch. removed the stop bolt for the throttle, it doesn't mention this in the manual but you will not get the peddle box out without first removing the stop bolt. Removed throttle cable, stop light switch and dropped the throttle linkage plate out of the way. Undo 6 little bolts, they are a real tw*t to get out, and then wrestle the pedal box out........easy .
.

Undo these two bolts allows removal of the main shaft, but that will be tomorrow.

All to replace this trunion insert. It doesn't look to bad but I know it's split through where you see the mark on it's edge. Clutch pedal creeks like a good 'un so time to change it before it wrecks the pedal itself.
Rear dampener with longer Eibach, before the top spring platform was about 2 inches above the end of the thread on the body.
PRRT waiting for an engine...............
New front caliper fitted.
After much cursing finally got this bad boy out. Took it out with the brake and clutch cylinders on it because I think it is easier to bleed the brakes/clutch than try and get the cylinders off while upside down in the foot well of the car. Marked up and split the intermediate steering column shaft. Undid the pipes for brakes and clutch. removed the stop bolt for the throttle, it doesn't mention this in the manual but you will not get the peddle box out without first removing the stop bolt. Removed throttle cable, stop light switch and dropped the throttle linkage plate out of the way. Undo 6 little bolts, they are a real tw*t to get out, and then wrestle the pedal box out........easy
Undo these two bolts allows removal of the main shaft, but that will be tomorrow.
All to replace this trunion insert. It doesn't look to bad but I know it's split through where you see the mark on it's edge. Clutch pedal creeks like a good 'un so time to change it before it wrecks the pedal itself.
Elise S2 260
Audi RS3
RRS HST
Triumph Trident 660
Triumph Speed Triple 1200RX
Audi RS3
RRS HST
Triumph Trident 660
Triumph Speed Triple 1200RX
Re: Winter Strip Down and Rebuild
Mike
The U bracket on the throttle pedal looks like the original thin one, which snapped in two on N1. I replaced it with the upgraded later one which is much thicker.
tut
The U bracket on the throttle pedal looks like the original thin one, which snapped in two on N1. I replaced it with the upgraded later one which is much thicker.
tut
Re: Winter Strip Down and Rebuild
Stripped the pedal box today..................

All the bits laid out...............

The clutch pedal with the bushes and trunion that needs changing. Undo the grub screw and back out the push rod.

Trunion and bushes then just push out...................

The knackered bush..............

The new ones ready to be fitted

Push in the bushes and make sure they are square to the edge, push the trunion into place and refit the push rod and don't forget the grub screw. Once preload on the clutch master cylinder is set, loctite the grub screw in place. Rebuilding the pedal box is a bit futtery but the manual shows where everything goes.
All the bits laid out...............
The clutch pedal with the bushes and trunion that needs changing. Undo the grub screw and back out the push rod.
Trunion and bushes then just push out...................
The knackered bush..............
The new ones ready to be fitted
Push in the bushes and make sure they are square to the edge, push the trunion into place and refit the push rod and don't forget the grub screw. Once preload on the clutch master cylinder is set, loctite the grub screw in place. Rebuilding the pedal box is a bit futtery but the manual shows where everything goes.
Elise S2 260
Audi RS3
RRS HST
Triumph Trident 660
Triumph Speed Triple 1200RX
Audi RS3
RRS HST
Triumph Trident 660
Triumph Speed Triple 1200RX
Re: Winter Strip Down and Rebuild
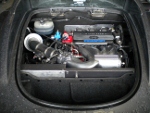
Next up................. ENGINE.
First off was cleaning all the block ready for fitting the big ends. Using Millers rebuild lub along with Molykote on the crank. i am a bit concerned that the Moly and/or the Millers has made the engine a bit tighter than it was, but more on this later.................

Block with it's mains in place

Crank been coated with Moly and drying, after which I polished it all but forgot to take a picture.

Mains coated with Millers, this stuff is like syrup really thick hope it does the trick.

Same for the bearing ladder, here dry but about to get the same as the block, least it doesn't run off like oil. For those in the know, bearings ended up being a blues in the block and blue, red, red, blue, red in the ladder.

Crank in and ladder on.

At this point I kinda side tracked and decided to fit the oil pump and................

................. then the water pump. God knows why, but suppose it needed doing at some point.

Then my head went completely up my a%%e and I prep'ed the oil rail, then noticed I hadn't fitted the pistons or liners . So wiped of the sealant and set about the liners.

A continuous 2mm bead.......... ye right, have they ever tried getting a 2 mm bead out of a tube of blue. Anyway, after a couple of goes it looked OK and in it went.

Followed by the pistons which I had built up earlier. After coming back from balance just need refitting to the rods, again with plenty Millers.

Guess what, didn't have any liner clamps and couldn't be bothered trying to make some. Nothing wrong with wood and tie wraps anyway. It did the job but I wouldn't do it this way again, was panicking that the liners would move.

Which they didn't seem to looking at he bead of sealant showing.

Fit the MLS head gasket on advice from Rog..................

Took the cams out really just to make it easier to handle and be able to see the bolt heads more clearly.

New LR bolts, oiled the threads and under the heads..............

.......... before torquing to first stage.

Marked up ready for the 2 x 180 turns.

Semi finished article. Stuck the flywheel on to turn the engine over, this was when I discovered that the engine is hell of a tight. Now this is either the miller being so thick or the extra thickness the moly adds although I doubt that. After a couple of turns it did free up so it should be good once oil has got through everything and flushed out the assembly lub. To be expected really as it is very viscose.
Anyway ploded on and fitted the oil filter housing to finish up the day

Looks loverly
Questions: How much sealant are you supposed to use as I don't seem to get very much out of the stupid little 10ml bottles, or am I being to liberal with it ?. Probably need to get more for the cam ladder and sump. Be a while before I fit it anyway as I waiting for lakeside to send a baffle, might be here by the end of the week.
Sorted the ignition coil thing out, Exige S1 VHPD coil is 3 wire in 4 out so have got one of them, one extra wire to run job done
Trying to decide weather to run a map sensor or not thoughts and comments welcome. I fact if you have any advice comments on the above fill yer boots
Tomorrow cams and cam timing.....................
First off was cleaning all the block ready for fitting the big ends. Using Millers rebuild lub along with Molykote on the crank. i am a bit concerned that the Moly and/or the Millers has made the engine a bit tighter than it was, but more on this later.................
Block with it's mains in place
Crank been coated with Moly and drying, after which I polished it all but forgot to take a picture.
Mains coated with Millers, this stuff is like syrup really thick hope it does the trick.
Same for the bearing ladder, here dry but about to get the same as the block, least it doesn't run off like oil. For those in the know, bearings ended up being a blues in the block and blue, red, red, blue, red in the ladder.
Crank in and ladder on.
At this point I kinda side tracked and decided to fit the oil pump and................
................. then the water pump. God knows why, but suppose it needed doing at some point.
Then my head went completely up my a%%e and I prep'ed the oil rail, then noticed I hadn't fitted the pistons or liners
A continuous 2mm bead.......... ye right, have they ever tried getting a 2 mm bead out of a tube of blue. Anyway, after a couple of goes it looked OK and in it went.
Followed by the pistons which I had built up earlier. After coming back from balance just need refitting to the rods, again with plenty Millers.
Guess what, didn't have any liner clamps and couldn't be bothered trying to make some. Nothing wrong with wood and tie wraps anyway. It did the job but I wouldn't do it this way again, was panicking that the liners would move.
Which they didn't seem to looking at he bead of sealant showing.
Fit the MLS head gasket on advice from Rog..................
Took the cams out really just to make it easier to handle and be able to see the bolt heads more clearly.
New LR bolts, oiled the threads and under the heads..............
.......... before torquing to first stage.
Marked up ready for the 2 x 180 turns.
Semi finished article. Stuck the flywheel on to turn the engine over, this was when I discovered that the engine is hell of a tight. Now this is either the miller being so thick or the extra thickness the moly adds although I doubt that. After a couple of turns it did free up so it should be good once oil has got through everything and flushed out the assembly lub. To be expected really as it is very viscose.
Anyway ploded on and fitted the oil filter housing to finish up the day
Looks loverly
Questions: How much sealant are you supposed to use as I don't seem to get very much out of the stupid little 10ml bottles, or am I being to liberal with it ?. Probably need to get more for the cam ladder and sump. Be a while before I fit it anyway as I waiting for lakeside to send a baffle, might be here by the end of the week.
Sorted the ignition coil thing out, Exige S1 VHPD coil is 3 wire in 4 out so have got one of them, one extra wire to run job done
Trying to decide weather to run a map sensor or not thoughts and comments welcome. I fact if you have any advice comments on the above fill yer boots
Tomorrow cams and cam timing.....................
Elise S2 260
Audi RS3
RRS HST
Triumph Trident 660
Triumph Speed Triple 1200RX
Audi RS3
RRS HST
Triumph Trident 660
Triumph Speed Triple 1200RX
Re: Winter Strip Down and Rebuild
2010 Honda VFR1200F
1990 Honda VFR400 NC30
2000 Honda VTR1000 SP1
2000 Kawasaki ZX-7R
1990 Honda VFR400 NC30
2000 Honda VTR1000 SP1
2000 Kawasaki ZX-7R

Re: Winter Strip Down and Rebuild
Nice work Mike! I've got to admit this is my favourite thread at the moment. Only problem is it takes me over an hour to load all these photos (slow as fcuk middle of nowhere Indian internet conection) but still keep them coming. When do you think you'll have it all back together?
1999 S1 Elise - For Sale
2003 E46 M3 - Sold
2004 Defender 90 Truck Cab - Sold
1989 Defender 110 (Project) - Sold
2003 E46 M3 - Sold
2004 Defender 90 Truck Cab - Sold
1989 Defender 110 (Project) - Sold