Page 1 of 2
Heater Fan Resistor Pack Install – anyone done it?
Posted: Wed Aug 06, 2008 10:19 pm
by johncam
My Heater fan has given up the ghost. Car is a 2005 S2 111s without A/C. Speaking to Ali today, he has confirmed my suspicions that it’s likely that it’s the common Resistor Pack problem. Its just the fan that’s not working – you still can still hear the stepper motor operating the flap in the air box (switching the airflow between the screen and the footwells) and the temp control seems to show similar signs of life.
The part itself is about £30 (A117P6000S) but the bad news is that it’s a clam-off job to gain access to fit the part. I already have my car booked into SLS on Tuesday for an A + belts Service but I’ve kind of wanted an excuse to take the clam off anyway to fix up the towing eye, driving light brackets and one of the plastic slats so I’m quite tempted to buy the part and have a go… I’ve fitted an exhaust and managed to change my brake pads before – while this is obviously more involved Ali seems to think its still do-able for an amateur. Worst case scenario, if I make an ar$e of it, Ali reckons it will take him about 4 hours to do it so it’s not the end of the world if I fail miserably.
If anyone’s thinking about doing this - or if your Resistor Pack as not gone YET but you are thinking of fitting the upgrade kit to prevent this happening (A120P0148S) and fancy popping round at the weekend (I’m in Paisley but don’t let that put you off) then I’ll supply the tea and bacon butties in return for some moral support and and a hand with the lifting off and on of the front clam.
Cheers,
John
Re: Heater Fan Resistor Pack Install – anyone done it?
Posted: Thu Aug 07, 2008 12:42 am
by tenkfeet
I would be interested to see how it goes on and have had my clam off . What day you thinking as its Kames on Sunday ?
Re: Heater Fan Resistor Pack Install – anyone done it?
Posted: Thu Aug 07, 2008 7:45 am
by kenny
If you could write up a nice guide on
How to, I could take that along with me to the next spanners and sponges

Ta.
Re: Heater Fan Resistor Pack Install – anyone done it?
Posted: Thu Aug 07, 2008 10:41 am
by r10crw
I can give you a talk through, but it really is a cracking job.
Clam off,
Wiper motor cowl off moving fuse pak to the side.
Drain A/C
Remove all AC pipes, condensor etc, also wiring and try to shift the loom out of the way.
Probably have to remove clutch pipe from resevoir,
Disconnect Heater matrix feed/return
Motor/Matrix housing comes in two parts, first split them then remove complete motor fan assembly. (two quick release catches on top, underside held in by a lip)
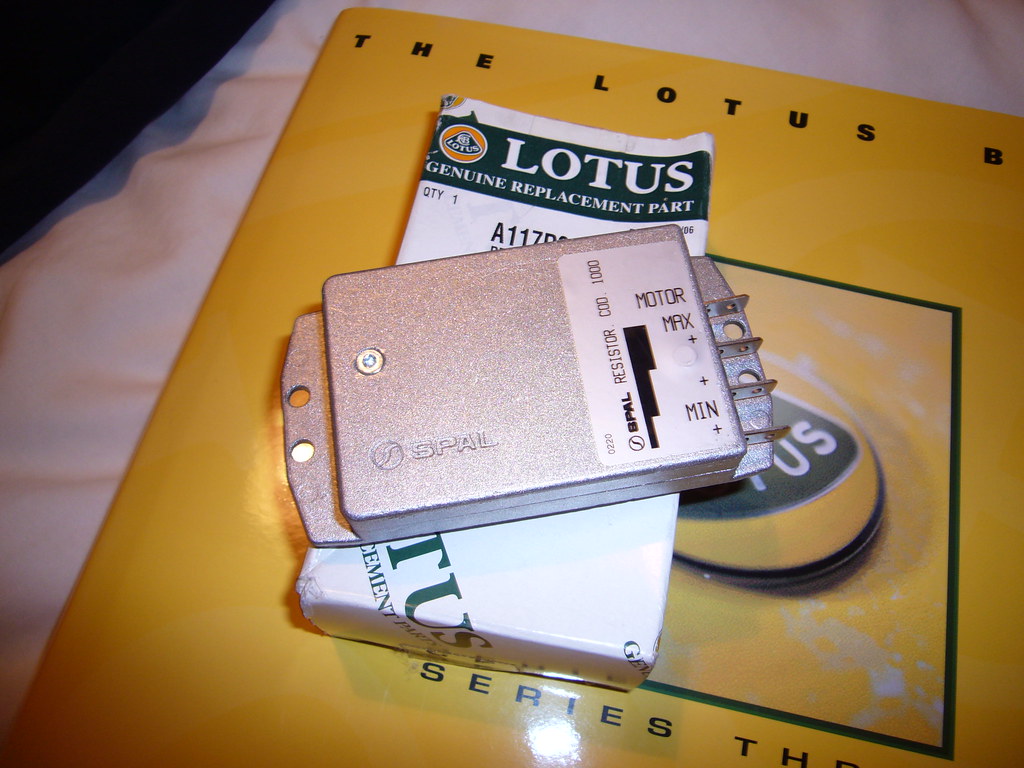
Dont know if its whats you have got but dont replace the resistor pack with the same thing. You need a different unit which is relocated higher up and cost me around 60 quid.
Call me on +447825229519 if you have any probs, queries but beware Im not in the country just now so expensive.
Cheers Craig.
Re: Heater Fan Resistor Pack Install – anyone done it?
Posted: Thu Aug 07, 2008 2:07 pm
by johncam
Alan - I ordered the part this morning so I should have it for tomorrow so I will be looking to tackle it on Saturday. I have a garage so the weather is not a big issue really. I will PM you my details if you would like to pop round - your experience with taking the clam off would be a great reassurance.
Neil - you are more than welcome if you fancy a run through - I take it the S160 is back in business?? Will PM you also.
Kenny - I was planning on doing a write up on this with plenty of photo's and I would be only too happy to lend a hand to help do yours if I manage to fix my own one.
Looking on the various forums it’s a very common problem with all the cars from 2003 onwards (Air Con and Non-Air Con). It was only fairly recently that Lotus released the upgrade kit in a service bulletin.
Craig - Thankfully my car does not have Air Con so this is the main reason I'm considering doing it myself. When I mentioned the idea to Ali that was the first thing he asked me - good effort on your part for managing this yourself. Don't get me wrong, it’s still a footery job but it looks like having a non-AC car simplifies the process a great deal. From what I've read (and I've done A LOT of reading up on this) the Toyota Elise / Exige has an even neater install so less space to work in.
I'm not positive but I had assumed that the upgrade pack only applies if you have a working resistor to begin with... which I don't have. The official Lotus fix to prevent this happening again on the standard resistor pack is to drill drainage holes below where the pack is fitted so that the water (which causes the problem) can drain away. I've just ordered standard part as it was in stock and available for the weekend.
Cheers,
John
Re: Heater Fan Resistor Pack Install – anyone done it?
Posted: Thu Aug 07, 2008 2:50 pm
by Dominic
NOOPS 160 wrote: then call in the cavalry......or Dom the buggers

You called??
Re: Heater Fan Resistor Pack Install – anyone done it?
Posted: Thu Aug 07, 2008 2:51 pm
by Dominic
kenny wrote:If you could write up a nice guide on
How to, I could take that along with me to the next spanners and sponges
Ta.
I was thinking of having a S & S & BBQ again, soonish.... just trying to find a free weekend!

Re: Heater Fan Resistor Pack Install – anyone done it?
Posted: Thu Aug 07, 2008 2:55 pm
by tenkfeet
Cool go for it .
Just in case it rains :If your garage is narrow and you cannot open both doors inside take the bolts out of base of the windscreen pillars before you put tha car in .
Let me know if you need a manual.
Re: Heater Fan Resistor Pack Install – anyone done it?
Posted: Thu Aug 07, 2008 5:28 pm
by kenny
Dominic wrote:kenny wrote:If you could write up a nice guide on
How to, I could take that along with me to the next spanners and sponges
Ta.
I was thinking of having a S & S & BBQ again, soonish.... just trying to find a free weekend!
That will give you time to study John's guide


Re: Heater Fan Resistor Pack Install – anyone done it?
Posted: Mon Aug 11, 2008 12:02 am
by johncam
Well, I have a heater fan again - thanks to the skill and sheer determination of Alan H (tenkfeet).
Got the new Resistor Pack from MMC (£30.84) on Friday.
I made a start around 10am on Saturday morning. Took the car out the garage to remove the clam bolts at the base of the windscreen then quickly put it back in as the rain was chucking it down. I then removed the access panels and the headlights. Alan arrived about 11am, working steadily, by lunch time we had removed the front clam.

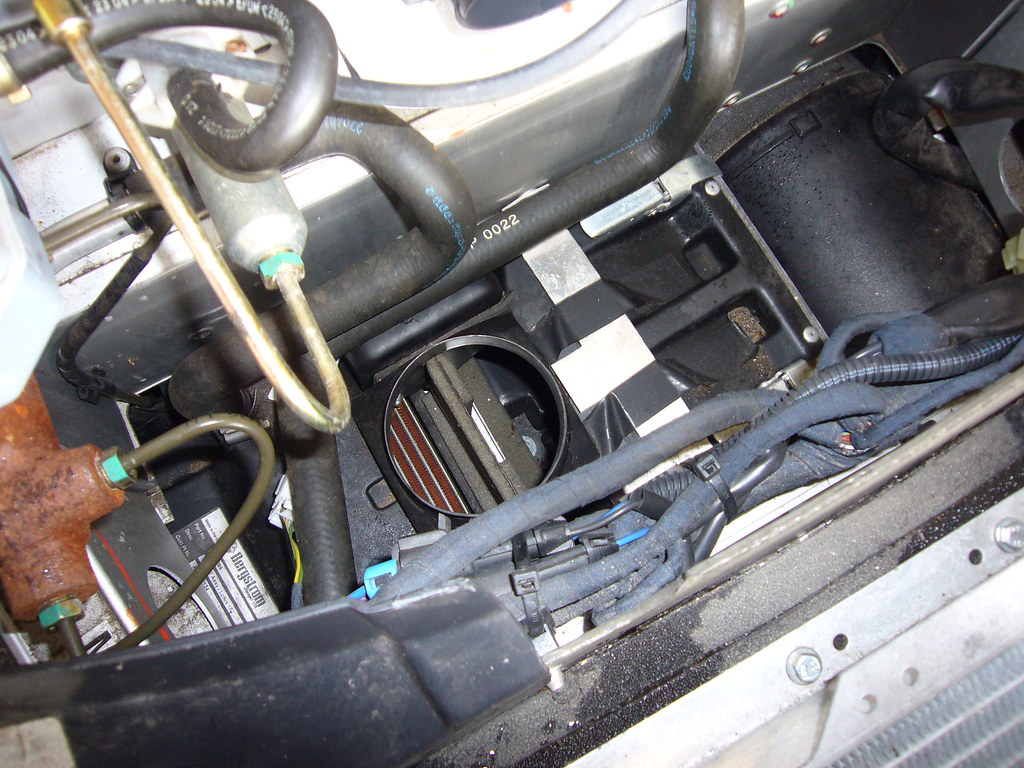
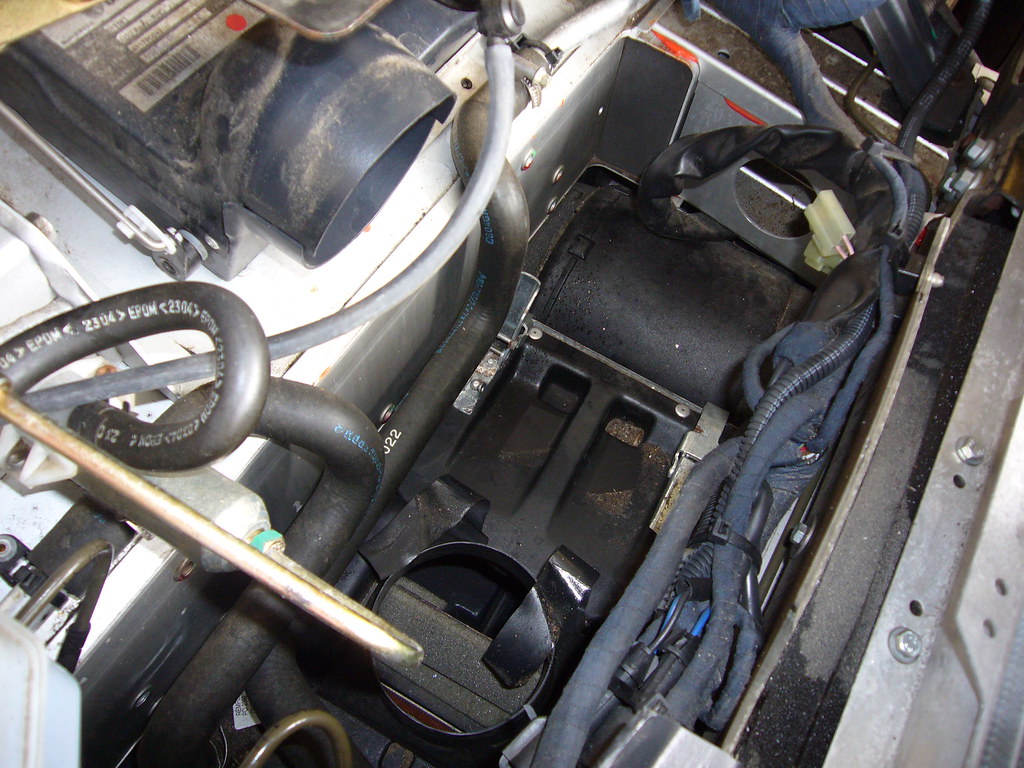
This is the view of the Heater Assembly (left) and Blower Unit (right) which is tucked away down between the cabin / chassis bulkhead and the front crash structure. Looking at it like this we were already thinking it was going to be incredibly difficult to remove it without disturbing the radiator or coolant pipes…
The Heater assembly is attached to the blower unit by the two silver clips and two bits of insulating tape - I kid you not!! They are easy to undo (the tape especially) and once you have done this the blower the can be moved from side to side to a certain extent in its space. We tried at this point to lift the blower out the car but this resulted in Alan loosing the skin from the little fingers on both hands. Once Mrs. Cam had done her Florence Nightingale bit we decided to regroup and approach this from a different angle. The new plan was to try and move the Heater Assembly to give a bit more space to remove the blower. To do this we first removed the alloy bracket holding it in place.
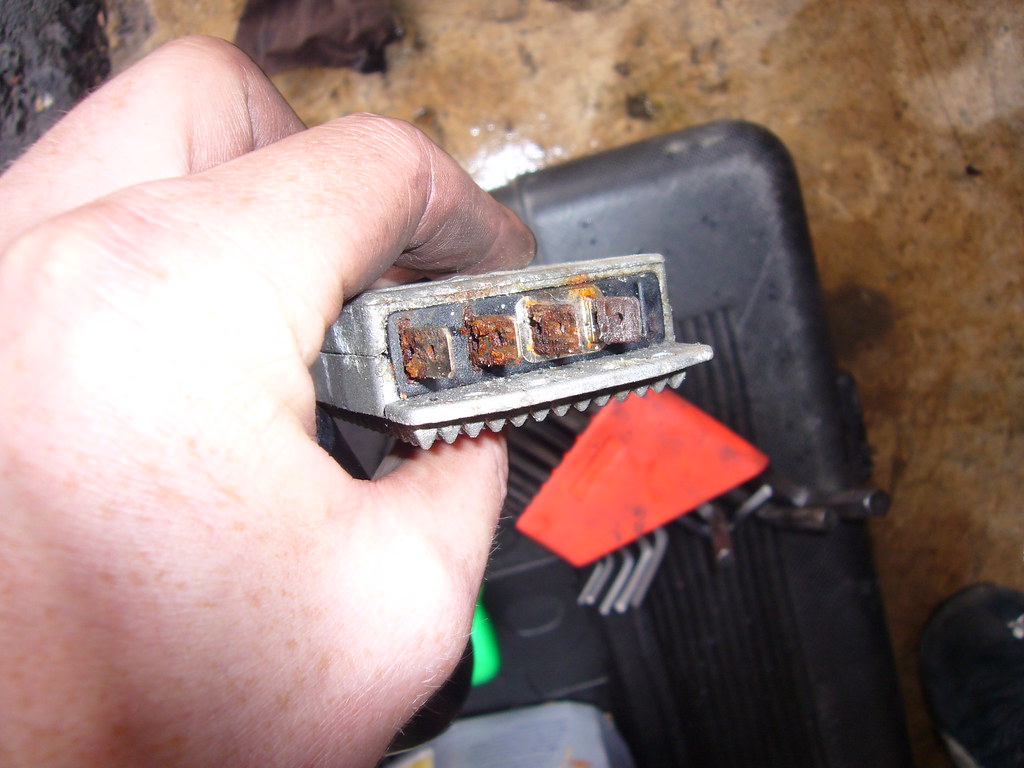
It was obvious that the loom would impede this so we cut the cable ties and moved the wires out of the way as much as their length would allow and unplugged the loom and the feed to the Heater. By sliding the Blower Unit to the far right of the space, we were then able to get our fingers between the Heater Assembly and the Blower. We were mindful of the coolant pipes when lifting the Heater Assembly up although they have been fairly generous with the length of the pipes so there was enough scope to get the unit above the blower at the blower end. We both tried again at lifting the blower out the car – after inventing several new swear words, we eventually conceded that this was not going to happen – despite all our efforts, all we had really managed to do was turn the blower in its aperture. This actually gave us our breakthrough – by continuing to rotate the blower we were eventually able to get at the Resistor Pack. As soon as we could see it we were in no doubt that it was water that had caused the fault in the first place. Before attempting to remove the spade connectors (they were rusted solid) I noted down the colours and the corresponding connectors. The spade connectors were actually quite sturdy and withstood being levered apart from the old resistor using a screwdriver blade. Once they were off, Alan removed the plastic covers from the spades and attacked them with some wet and dry paper – they actually cleaned up really well.

The resistor is fixed to the blower by two screws, once they are out you just lift it out and you can seen inside to the fan blades.
The new unit just slots into the same space and you then reconnect the spades. We reattached the loom and Heater Feed - the moment of truth. I jumped into the car and fired up the electrics and rather nervously turned the fan controls – thankfully it worked and the pair of us gave out a big cheer!!
In the Lotus Service Bulletin it suggests that you drill holes in the area below the blower assembly to prevent this problem reoccurring. In my car the blower unit is sitting directly above the chassis so understandably we were not too keen to do this. I decided that in another 4 years I’ll just take the pain of doing this again. Had I known this then I would have probably bought the kit from Lotus to move the resistor to the top of the blower unit. We simply coated the outside of the spades with high quality bearing grease and began the process of putting everything back in the way it came out.

During this process I decided to do the mod to prevent dust entering the cabin via the heater vents – a pair of Ann’s Pretty Polly’s were sacrificed for this cause and put in place over the end of the flexible ducting leading to the dashboard.
Alan was in his element when it came to putting the clam back on. All I can say is I will be flying Flybe whenever possible from now on – he is a real perfectionist who takes pride in his work which I imagine is a pretty important trait for someone who maintains planes for a living.
By the time we were finished it was 7.45pm – the day had literally flown in (no pun intended Alan) but the banter had been good and the end result is that we have been able to document the process which will hopefully be a useful reference to anyone else that has this problem with their car.
All the best,
John
Re: Heater Fan Resistor Pack Install – anyone done it?
Posted: Mon Aug 11, 2008 9:40 am
by tenkfeet
Good write up John . I wonder if we did it the wrong way when we tried to get the fan out ,if enyone has done please tell how you get it out . I am going to look at mine and see if its possible to do it through the service panels as long as you were just rotating the fan .
Re: Heater Fan Resistor Pack Install – anyone done it?
Posted: Sat Nov 01, 2008 11:48 am
by Anderz
Hi All, I'm new to this site and this is my 1st post.Well done guys, An Excellent docu'd account,found the thread link in Seloc,this will be a massive help when i do my resistor pack.I have a late 03 plate 111S and my temparature control is also gone on my heater,it never worked since buying the car over a year ago and it only blew hot air when the fan was working,which was overpowering with the odd summer day we managed to get on the Clyde Coast.I'm sure this knob is not cable controlled but electronic.
I hoped to fix this while i'm in and around the heater assembly,can anyone tell my if this is just a standard potentiometer.
Cheers, Andy
Re: Heater Fan Resistor Pack Install – anyone done it?
Posted: Sat Nov 01, 2008 12:27 pm
by mac
Andy,
If it still blows only that you can't vary the temp then it's a different and potentially a much simpler fix
Take off the pax side access panel - towards the middle of the car you'll see a large silver tube - follow that down into the car towards the ground - it terminates in a black box. This is the heater matrix panel. On this you'll find a little pier with an arm and a cable attached to the arm - this controls the temp by varying the flow.
With the help of an assistant try and move the knob in the car and watch to see if the motion is lost at this point - you should see it trying to strain. If so attack with your favourite pentrating fluid (plusgas,WD40,GT85) and leave to sit for 5 - 10mins to work.
Then with the aid of a pair of pylers you want to double team the stuck arm - working together with the person in the cab turning the knob and you assisting with the plyer (make sure not to fight against each other) - Keep going back and forth until it's freed off completely - another skoosh of fluid will help flush away any broken off crud.
If you don't see lost motion at this point it could be that the cable has escaped from one of it's routing clip and is expanding/contracting beneath the dash. This is a dash off job which I haven't attempted so can't offer any advice.
Mac
Re: Heater Fan Resistor Pack Install – anyone done it?
Posted: Sat Nov 01, 2008 1:55 pm
by Anderz
Mac,
Thanks for that, the blower isn't working either so it looks like i got the double trouble of resistor pack and temp control.
will tackle the blower first,its near impossible to use the car in the rain without blower and worse if there are two people in it,its driving me mad. still like the idea of extending the wiring into the cabin and fitting that electronic control unit for $27 and do away with the Lotus resistor pack.
Cheers again, Andy
Re: Heater Fan Resistor Pack Install – anyone done it?
Posted: Sun Sep 06, 2009 3:00 pm
by DJ
Handy thread this and just wanted to note my thanks to Johncam for doing the write up.

A couple of weeks ago in the rain I turned the fan to full power and experienced the burning smell. Turned it off and tried it later only to find it didn't matter what setting the knob was at, just a warm breeze came out. Was sure I had read about this being a common fault. My search under technical didn't find this thread - it was probably there but I got fed up looking after about 4 pages - but there is a link to it on the SELOC Wiki.
Tried removal through the service panels rather than full front clam removal and just over an hour and a few scrapped knuckles later I had the old resistor out.... so the good news is it definitely can be done that way.
Away to order a new one on monday and imagine re-fit will be as fiddly.
Cheers again for taking the time to do the write up. Between this and the SELOC Wiki it was a great help and would have struggled otherwise.